


-10-
Assembly
A wide assortment of router bits with different
profiles is available separately. Use 1/2"
shank whenever possible, and only use good
quality bits.
To prevent personal injury,
always remove the plug
from power source before removing or
installing bits or accessories.
INSTALLING A ROUTER BIT
Place router upside down or lay router on its
side with the base resting on the bench.
Another option is to remove the motor from
the base before installing the bit.
1. Remove the chip shield (or flip up if plunge
base is attached.
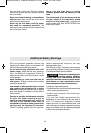
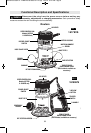
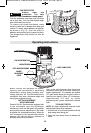
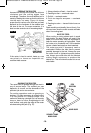
2. Hold the armature shaft in place with the
shaft wrench (Fig. 4)
3. Next, use the collet wrench to loosen the
collet chuck assembly in counter-
clockwise direction (viewed from under the
router).
4. Once you have verified that the bit's shank
is of the proper diameter for the collet to
be used, insert the shank of the router bit
into the collet chuck assembly as far as it
will go, then back the shank out until the
cutters are approximately 1/8" to 1/4" away
from the collet nut face.
5. With the router bit inserted and the shaft
wrench holding the armature shaft, use the
collet wrench to firmly tighten the collet
chuck assembly in a clockwise direction
(viewed from under the router). To ensure
proper gripping of the router bit and
minimize run-out, the shank of the router
bit must be inserted at least 5/8".
To tighten or loosen collet nut, hold both
wrenches in one hand and and squeeze
the wrenches together.
When the templet guide
has been removed from
base, do not use router bits greater than
2" in diameter as they will not fit through
the sub-base.
Cutter diameter must be at
least 1/4” smaller than
opening for the bit and cutter.
To prevent damage to
tool, do not tighten collet
without a bit.
NOTE: The bit shank and chuck should be
clean and free of dust, wood, residue and
grease before assembling.
REMOVING THE ROUTER BIT
1. Use the shaft and collet chuck wrenches
as described earlier, and turn the collet
chuck assembly in a counter-clockwise
direction.
2. Once the collet chuck assembly is
loosened continue to turn the collet chuck
assembly until it pulls the collet free from
its taper, and the router bit can be
removed.
NOTE: The collet chuck is self-extracting; it
is NOT necessary to strike the collet chuck to
free the router bit.
!
WARNING
COLLET CHUCK CARE
With the router bit removed, continue to turn
the collet chuck counter-clockwise until it is
free of the shaft. To assure a firm grip,
occasionally blow out the collet chuck with
compressed air, and clean the taper in the
armature assembly shaft with a tissue or fine
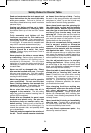
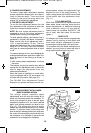
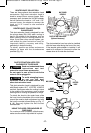
brush. The collet chuck is made up of two
component parts as illustrated (Fig. 5); check
to see that the collet is properly seated in the
collet chuck nut and lightly thread the collet
chuck back onto the armature shaft. Replace
worn or damaged collet chucks immediately.
COLLET
COLLET
NUT
FIG. 5
COLLET
CHUCK
!
WARNING
!
CAUTION
!
WARNING
SHAFT
WRENCH
COLLET
WRENCH
FIG. 4
BM 2610018532 01-12:BM 2610018532 01-12.qxp 1/23/12 9:21 AM Page 10