


/,5"2)#!4)/.2%15)2%$
Do not use lubricants as they may damage
the tool.
,7!93,/!$.!),3).4/4(%
4//,3-!'!:).%"%&/2%4(%
"!44%290!#+)3#/..%#4%$Connecting the
battery pack after loading nails reduces the risk
of unintentionally driving a nail and injuring
yourself or someone else.
(%.,/!$).'4(%4//,3
-!'!:).%#(%#+4(!44(%
.!),&/,,/7%23,)$%33-//4(,9"905,,).'
7)4(&).'%2 If not smooth, nails can be driven
at irregular angle.
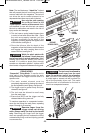
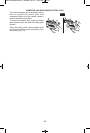
1. Insert appropriate collated nail strips into
loading slot in back of magazine, see figure
2. See tool specifications to determine
appropriate nail sizes and angles.
2. Orient a strip of approved nails with the tips
pointed down, the nails should be inserted
with the tips first into the slot, see figure 2,
and to align the head of the nail with the top
“T” portion of the slot. Insert nails fully into
magazine making sure that the last nail in
the strip slides past the Nail Hold Back
Spring, see figure 3.
WARNING
-9-
33%-",9
0%2!4).'.3425#4)/.3
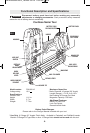
Your tool is equipped with two devices that
require actuation before the tool will fire, the
work contact element and the finger trigger.
There is one mode that determines how the
tool fires nails.
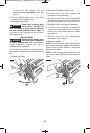
;%15%.4)!,<)2).'/$% In “sequential”
firing mode, there is a predetermined
sequence required to fire a nail. The work
contact element must first be depressed
against the work piece. A nail will then fire
when the trigger is depressed. To fire
another fastener, the work contact element
must be removed from the work piece, and
the trigger must be released. The sequence
can then be repeated.
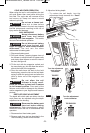
Your tool is also equipped with a lock-out
switch (Fig.1). This switch is designed to lock
the work contact element in order to help
prevent accidental starts.
To lock tool, move the lock-out switch
completely UP so that the lock symbol
is visible.
To unlock tool, move the lock-
outswitch completely DOWN so that
the unlock symbol is visible.
Follow the instructions below to prepare your
tool for operation.
1. All tool operators and their immediate
supervisors must become familiar with the
operator safety instructions before operating
the tool. The instructions begin on page 2 of
this manual.
2. Included with each tool is a copy of these
Operating/Safety Instructions. Keep this
publication for future reference.
!
WARNING
FIG. 3
FIG. 2
!
WARNING
BM 2610034445 03-14_FNH180 3/27/14 11:52 AM Page 9