


Chicago Pneumatic Compressors
62 305 258 65
01/2008
Page 10
Section 3 - Implementation
A - Preparation for start-up
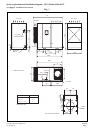
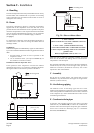
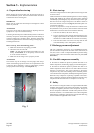
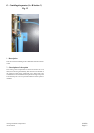
Before starting the set for the first time, the operator must get to
know the different systems. The main locations which have to be
examined are shown on the figures.
IMPORTANT
Before start up, make sure that transport red wedges have been
effectively removed.
ATTENTION
The power circuit must be turned whenever adjusting electrical
equipment or to prevent accidental starting.
Loosening of electrical power cables that may be due to vibrations
caused by transport or initial heating entails abnormal heating of
contactors, which may even destroy them. Therefore, these cables
must be re-tightened at line contactor incoming and outgoing, star
and triangle before use.
Before start-up, check the following points :
1 - Make sure that the unit is properly grounded.
2 - Check the oil level in the tank.
NOTE : the tank has been filled with suitable oil in the
factory. See Section 8 - A for the quality of oil to be used
or for oil renewal conditions.
3 - Make sure the oil change valve is properly closed.
ATTENTION
The oil filler cap, the oil change valve and plugs must always
remain closed during operation and never be opened before the
system has been completely vented to atmospheric pressure
(except pressurized oil change : See Chapitre 8 - A).
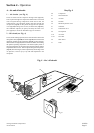
Fig. 3
B - First start-up
Check the voltage between the three phases before using the unit
for the first time.
Check the direction of rotation (following the arrow on the coupling
housing rep. 1- Fig. 3) by pressing the "Start" button, followed
immediately by the emergency stop. If it does not spin in the right
direction reverse two stages of the power cord. When it rotates in
the correct direction, the oil level (Fig. 19) should drop after 4 or
5 seconds of operation.
It is also very important to verify the direction of rotation of the
fan (indicated on it by an arrow) anti-clockwise seen from inside
the machine or clockwise seen from outside the machine).
1 - Press the ON button, the motor starts up.
2 - Leave it running for a few minutes with the discharge valve
slightly open to observe the compressor under load. Ensure
that there are no leaks. Reblock the connectors if necessary.
3 - Press the OFF button. The motor will stop and the unit
will automatically vent to atmospheric pressure.
C -Discharge pressure adjustment
The unit is adjusted in the factory for a MAXIMUM pressure
(for the maximum output from the outlet of the central unit) of
100, 125, 150 or 175 PSI . To adjust the backflow pressure setting
to a lower value, refer to the manual of the electronic plate (refer
E Section 1).
D - Parallel compressor assembly
If the CPVS is intended to operate in parallel with other CP or
similar compressors, the discharge piping can be linked together.
If the CPVS is intended to operate in parallel with other CP or
similar compressors, there must be an air tank common to all the
alternative compressors. The pulses emitted by alternative
compressors may cause serious damage to the minimum pressure
valve and the CPVS oil separator, and disrupt the regulation system.
When the rotary compressor is operating in parallel with an alter-
native compressor, the latter should be adjusted so that the rotary
compressor takes the main load. It is cheaper to run this way.
E - Safety
The oil used for cooling the machine is a liquid combustible under
the effect of strong heat. In case of fire in the machine, it is essential
to respect the regulatory measures on the compressor. The type of
fire in a compressor is defined as "class B" and in presence of a live
electrical conductor, it is recommended to use a CO2 extinguisher
functioning by "smothering" (starvation of oxygen) while observing
the user instructions applicable to the model.
1