


NOTE: The adapter illustrated is for use only if you
already have a properly grounded 2-prong receptacle.
The use of any extension cord will cause some loss of
power. To keep this to a minimum and to prevent
overheating and motor bum-out, use the following table
to determine the minimum wire size (A.W.G.) extension
cord.
Use only 3 wire extension cords which have 3-prong
grounding type plugs and 3-prong receptacles which
accept the plug on the saw.
contents
Warranty .................................................................... 2
Safety instructions for Table Saw .......................... 2
Additional Instructionsfor Rip Type Cuts ............... 4
Additional Instructionsfor Cross Cut Type Cuts .... 5
Glossary .................................................................... 5
Motor Specifications and
Electrical Requirements ...................................... 6
Connecting to Power Source Outlet ...................... 6
Motor Rotation ....................................................... 7
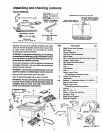
Unpacking and Checking Contents ........................ 8
Tools Needed ......................................................... 8
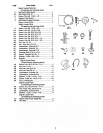
List of Loose Parts ................................................. 8
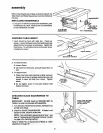
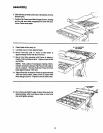
Assembly ................................................................ 10
Installing Handwheels .......................................... 10
Checking Table insert .......................................... 10
Checking Blade Squareness to Table ................. 10
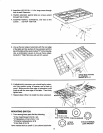
Assembling Steel Legs ........................................ 11
Mounting Saw ...................................................... 11
Attaching and Assembling Table Extensions ....... 12
Mounting Switch .................................................. 13
Installing Right Front Rip Fence Guide Bar ......... 14
Installing Rear Fence Guide Bar .......................... 15
Aligning Rip Fence ............................................... 17
Self Aligning Spring Adjustment .......................... 17
Rip Fence Lock Lever Adjustment ....................... 18
Rip Fence Alignment Adjustment ........................ !8
Adjusting Rip Scale Pointer ................................. 19
installing Blade Guard ......................................... 19
Mounting the Motor .............................................. 21
Installing Belt Guard ............................................. 23
Plugging in Motor ................................................. 24
Getting to Know Your Saw .................................... 25
On.Off Switch ....................................................... 25
Elevation Handwheel ........................................... 26
Tilt Handwheel ..................................................... 26
Tilt Lock Handle ................................................... 26
Rip Fence ............................................................. 26
1 H.P. MOTR 110 - 120V
Extension Cord
Length Wire Size A.W.G.
0 - 25 Feet No. 16
26 - 50 Feet No. 14
51 - 100 Feet No. 12
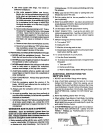
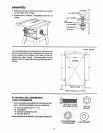
CHECK MOTOR ROTATION
The motor must rotate CLOCKWISE when viewed from
the shaft end to which you wilt mount the pulley. (See
page 21 .)If it does not, do not assemble or use saw until
motor with right rotation is installed.
Miter Gauge ......................................................... 26
Blade Guard ......................................................... 26
Table Insert .......................................................... 26
Removing and Installing Sawblade ...................... 27
Exact-I-Cut ........................................................... 27
Safety instructions for Basic Saw Operation ...... 28
Basic Saw Operation - Using the Miter Gauge .... 30
Work Helpers ....................................................... 30
Crosscutting ......................................................... 31
Repetitive Cutting ................................................ 32
Miter Cutting ......................................................... 32
Bevel Crosscutting ............................................... 33
Compound Miter Cutting ...................................... 33
Using the Rip Fence ............................................... 33
Ripping ................................................................ 34
Bevel Ripping ....................................................... 34
Using Featherboards for Thru Sawing ................. 36
Resawing ............................................................. 36
Cutting Panels ..................................................... 37
Rabbeting ............................................................ 37
Ploughing and Molding ........................................ 37
Dadoing ................................................................ 38
Molding Cutting .................................................... 38
Using Featherboards for Non Thru-Sawing ......... 38
Adjustments ........................................................... 39
Miter Gauge ......................................................... 39
Heeling Adjustment or Parallelism of Sawblade
to Miter Gauge Groove .................................... 39
Blade Tilt, or Squareness of Blade to Table ........ 41
Tilt Mechanism ..................................................... 42
Maintenance ........................................................... 43
Lubrication .............................................................. 43
Recommended Accessories ................................. 43
Trouble Shooting ................................................... 44
Motor .................................................................... 44
Repair Parts ........ .................................................... 46
7