


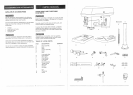
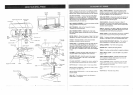
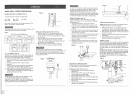

REMOVINGCHUCK(FIG.Z)
1. Withtheswitch"OFF",openthejawsofthechuckas
wideaspossiblebyturningthechuckcounterclockwise.
2. Tapthechuck(1)lightlywitha plastictippedhammer
atthetopofchuck,untilthechuckreleases.
NOTE:Placeonehandbelowthechucktocatchitwhen
it fallsout.
Fig. Z
To avoid injury from an accidental start, ALWAYS make
sure the switch is in the "OFF" position, the switch key is
removed, and the plug is not connected to the power
source outlet before removing or installing the chuck.
BASIC OPERATnON INSTRUCTIONS
To get the best results and minimize the likelihood of
personal injury, follow these instructions for operating your
drill press.
For your own safety, atways observe the safety
INSTRUCTIONS listed here and on pages 3, 4, and 5
of the instruction manual.
YOUR PROTECTION
To avoid being pulled into the power toot, do not wear
loose clothing, gloves, neckties, or jewelry. Always tie
back long hair.
1. If any part of your drill press is missing, malfunctioning,
damaged or broken, stop operation immediately until
that part is properly repaired or replaced.
2. Never place your fingers in a position where they
could contact the drill bit or other cutting too]. The
workpiece may unexpectedly shift, or your hand
could slip.
3. To avoid injury from parts thrown by the spring, follow
instructions exactly when adjusting the spring tension
of the quill.
4. To prevent the workpiece from being torn from your
hands, thrown, spun by the tool, or shattered, always
properly support your workpiece as follows:
a.
Always position BACKUP MATERIAL (used
beneath workpiece) so that it contacts the left side
of the column, or use the fence provided and
clamp to brace a smaller workpiece.
b, Whenever possible, position the WORKPIECE to
contact the left side of the column. If it is too short
or the table is tilted, use the fence provided or
clamp solidly to the table, using the table slots.
c. When using a drill press vise, always fasten it to
the table.
d. Never do any work freehand (hand-holding the
workpiece rather than supporting it on the table),
except when polishing.
e. Securely lock the head and table support to the
column, and the table to the table support, before
operating the drill press.
f. Never move the head or the table while the tool
is running.
g. Before starting an operation, jog the motor switch
to make sure the drill or other cutting tool does
not wobble or cause vibration.
h. tf a workpiece overhangs the table so it will fall
or tip if not held, clamp it to the table or provide
au.'kiliary support.
i. Use the fence provided or other fixtures for
unusual operations to adequately hold, guide,
and position workpiece.
j. Use the SPINDLE SPEED recommended for the
specific operation and workpiece material. Check
the panel on the inside pulley cover or the chart
below for drilling speed information.
For accessories, refer to the instructions provided
with each accessory.
5. Never climb on the drill press table, it could break or
pull the entire drill press down on you.
6. Turn the motor switch "OFF", and put away the switch
key when leaving the drill press.
7. To avoid injury from thrown work or tool contact, do
not perform layout, assembly, or set up work on the
table while the cutting tool is rotating.
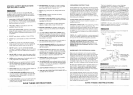
DRILUNG SPEED TABLE (rpm)
Material
Wood Alum.,Zinc,Brass iron,Steel
3600 3600 3600
DrillBit
Diam.
(Inches)
1/16
1/8
3/I 6
1/4
5/16
3/8
1/2
2610
2610
1600
1600
880
680
26!0 540
t 8
ii
i
I
,
[
:!
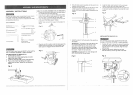
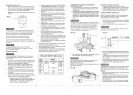
POSITIONING THE TABLE AND WORKPiECE
(FIGURE AA and IBB)
1. Lock the table (!) to the column (2) at a position so
the tip of the drill bit (3) is just above the top of the
workpiece (4).
2. ALWAYS place a BACK-UP MATERIAL (scrap wood)
on the table beneath the workpiece. This will prevent
splintering or heavy burring on the underside of the
workpiece. To keep the back-up material from spinning
out of control, it MUST contact the LEFT side of the
column.
To prevent the workpiece or backup material from being
torn from your hands while drilling, you MUST position it
against the teft side of the column. If the workpiece or
the backup material is not long enough to reach the
column use the fence provided with the drill press to
brace the workpiece., or clamp it to the tableo Failure to
do this could result in personal injury.
Fig. AA
i
3. For small pieces that cannot be clamped to the table,
use a drill press vise (optional accessory).
The drill press vise MUST be clamped or botted to the
table to avoid injury from a spinning workpiece, or
damaged vise or bit parts.
Remove the drill press fence when it interferes with other
driti press accessories.
Fig. BE}
HOLDING A DRiLMNG LOCATION
1. Using a Centerpunch or sharp nail, make an
indentation in the workpiece where YoUwant the hole.
2. Using the feed handles, bring the drill down to align
with the indentation before turning the drill "ON".
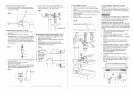
TILTING THE TABLE (FIGURE CC}
NOTE: The table and support (1) has a predrilled hole
with a locking pin inserted for locking the table into a
predetermined 0° horizontal position.
1, To use the table in a bevel (tilted) position; TIGHTEN
the nut (2) on the locking pin clockwise to RELEASE
it from the table support.
2. Loosen the large hex head bevel Jocking bott (3).
To prevent injury, be sure tO hold the table & table arm
assembly, So it will not swivel or tilt.
Fig. CC
1
3. Tilt the table, aligning the desired angle measurement
to the zero line opposite the scale (4). Tighten the bevel
locking bolt.
4. To return the table to its original position, loosen the
bevel locking bolt (3). Realign the bevel scale (4) to
the 0° position,
5. Loosen the nut (2) on the locking pin to the OUTSIDE
END OF THREADS. Gently tap the locking pin until it
is seated in the hole. Finger tighten the nut.
To avoid injury from spinning work or toot breakage, always
clamp workpiece and backup material securely to the
table before operating the drill press with the table tilted.
FEEDING
t. Pull down the feed handles with only enough effort to
allow the driJi bit to cut.
2. Feeding too slowly might cause the drill bit to burn.
Feeding too rapidly might stop the motor, cause the
belt or drill to slip, or tear the workpiece loose and
break the drill bit.
3. When drilling metal, it may be necessary to lubricate
the drill bit tip with motor oil, to prevent burning the tip.
19