


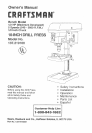

-i
MA NTAH a NG YOUR DR LL PRESS
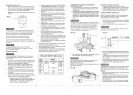
For your own safety, turn the switch OFF and remove the
plug from the power source outlet before maintaining or
_ubricating your drill press.
Frequentiy blow out using an air compressor or dust
vacuum, any dust that accumulates inside the motor.
A coat of automotive paste wax applied to the table and
column will help to keep the surfaces clean.
To aveid shock or fire hazaizd, if the power cord is worn
or cut in any way, have it replaced immediately.
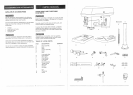
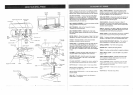
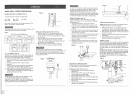
LUbrICATiON
A!l of the drill press ball beadngs are packed with 9tease
at the factory. They require no further k_bdcation.
Periodically lubricate the 9ear and rack, table elevation
mechanism of the spindle and the rack (teeth) of the quill.
:i
!
} j
i !=
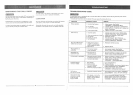
TROUBLESHOOTING GUIDE
To avoid injury from an accidental start, turn the switch OFF and always remove the plug from the power source
before making any adjustments,
o Consult your local Sears Service Center if for any reason the motor will not run.
PROBLEM
Noisy operation.
Drill bit burns.
Run out of drill bit point -
dr!lied hole not round.
PROBABLE CAUSE REMEDY
t. Incorrect belt tension.
2. Dry spindle.
3. Loose spindle pulley.
4. Loose motor pulley.
t. Incorrect speed.
2. Chips not coming out of hole.
3. Dull drill bit.
4. Feeding too slowly.
5. Not lubricated.
.
Hard grain in wood or
lengths of cutting flutes
and/or angles not equal.
Bent drill bit.
1. Adjust tension. See Section
"ASSEMBLY - TENSIONING BELT"
2. Lubricate spindle. See Section "LUBRICATION".
3. Check tightness of retaining nut on pulley, and
tighten if necessary.
4. Tighten set screw in motor pulley.
1. Change speed. See Section "BASIC DRtLL
PRESS OPERATION - SPINDLE SPEEDS"
2. Retract drill frequently to clear chips.
3. Resharpen drill bit,
4, Feed fast enough - allow drill to cut.
5. Lubricate drill. See Section "BASIC DRILL
PRESS OPERATION - FEEDING"
1. Resharpen drill bit correctly.
2. 2. Replace drill bit.
Wood splinters on 1. No backup material 1. Use backup material. See Section
underside, under workpiece. "BASIC DRILL PRESS OPERATION",
W,/orkpiece torn 1. Not supported or 1. Support workpiece or clamp it. See Section
loose from hand. clamped properly. "BASIC DRILL PRESS OPERATION".
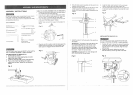
Drill bit binds in workpiece. 1. Workpiece pinching drill bit,
or excessive feed pressure.
2. Improper belt tension.
!. Bent drill bit.
2. Worn bearings.
3. Ddtl bit not properly
installed in chuck.
4. Chuck not properly installed.
Excessive drill bit
runout or wobble.
Chuck will not stay
attached to spindle.
It falls off when
trying to install.
1. Support workpiece or clamp it. See Section
"BASIC DRILL PRESS OPERATION".
2. Adjust tension. See Section
"ASSEMBLY - TENSIONING BELT."
!. Use a straight drill bit.
2. Replace bearings.
3. Install drill properly. See Section "BASIC DRILL
PRESS OPERATION" and "ASSEMBLY".
4. lnstail chuck properly. See Section
"ASSEMBLY -INSTALLING THE CHUCK".
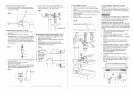
Quill returns 1. Spring has improper tension. 1. Adjust spring tension. See Section"ASSEMBLY-
too slow or too fasL ADJUSTMENTS - QUILL RETURN SPRING":
!. 1.
Dirt, grease, or oil on the
tapered inside surface of
chuck or on the spindle's
tapered surface.
Using a household detergent, clean the
tapered surface of the chuck and spindle to
remove all dirt, grease and oil. See Section
"ASSEMBLY - INSTALLING THE CHUCK"