


BASIC DRILL PRESS OPERATIONS
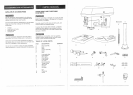
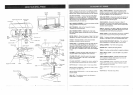
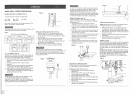
SPEEDS AND BELT PLACEMENT (FIG. T)
This drill press has 5 speeds, as listed below:
540 RPM 880 RPM 1600RPM
2610 RPM 3600 RPM
See inside of the belt guard for specific placement of the
belts on the pulleys to change speeds.
To avoid possible injury, keep guard closed, in place, and in
proper working order while too! is in operation.
Fig.T
Belt / Pulley Position-RPM Chart
oRPM 80 PM 1 16oo PM I
2610 RPM 3600 RPM
l .........
ON / OFF SWITCH (FIG. U)
The "ON / OFF" switch has a removable, yellow plastic key.
With the key removed from the switch, unauthorized and
hazardous use by children and others is minimized.
t. To turn the drill press "ON", insert key (1) into the slot of
the switch (2), and move tile switch upward to the "ON"
position.
2. To turn the drill press "OFF", move the switch
downward.
3. To lock the switch in the "OFF" position, grasp the end,
or yellow part, of the switch toggle, and pull it out.
4. With the switch key removed, the switch wili not operate.
5. if the switch key is removed while the drill press is
running, it can be turned "OFF" but cannot be restarted
without inserting the switch key.
Always lock the switch "OFF" when the drill press is not in
use. Remove the key and keep it in a safe place.
tn the event of a power failure, blown fuse, or tripped circuit
breaker, turn the switch "OFF' and remove the key, preventing
an accidental startup when the power comes on.
Fig. U
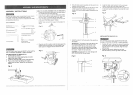
iNSTALLING DRILL BIT IN CHUCK (FIG. V)
1. With the switch "OFF" and the yellow switch key
removed, open the chuck jaws (1) using the chuck
key (2). Turn the chuck key counterclockwise to open
the chuck jaws.
2. Insert the drill bit (3) into the chuck far enough to
obtain maximum gripping by the jaws, but not far
enough to touch the spiral grooves (flutes) of the drill
bit when the jaws are tightened.
3. Make sure that the drill is centered in the chuck.
4. Turn the chuck key clockwise to tighten the jaws.
To avoid injury or accident by the chuck key ejecting
forcibly from the chuck when the power is turned "ON", use
only the self-ejecting chuck key supplied with this drill
press. Always recheck and remove the chuck key before
turning the power "ON".
Fig.V
2
i =
i
i
i
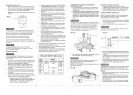
To prevent the workpiece or backup material from being
torn from your hands while drilling, you MUST position the
workpiece against the LEFT side of the column. If the
workpiece or the backup material is not long enough to
reach the column, clamp them to the table, or use the fence
provided with the drill press to brace the workpiece. Failure
to secure the workpiece could result in personal injury.
Fig. X
t
2
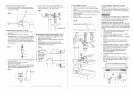
USINGTHE FENCE (FIG. W)
The fence provides a way of accurately and quickly
setting up the workpiece for more precision or repetitive
drilling operations.
1. Using the centerpunch or sharp nail, make an
indentation in the workpiece where you want to drill.
2. Lower the drill bit to align with the indentation on the
workpiece. See "HOLDING A DRILLING LOCATION"
page t9.
3. Loosen the knobs (1) and slide the fence back stop (2)
firmly against the long side of the workpiece. Tighten
the knobs when in position.
4. Loosen the wing nut (3) and slide the end stop (4) along
the fence until it is firmly against the left side of the
workpiece. Tighten the wing nut.
5. Check the accuracy by drilling a scrap workpiece.
Adjust if needed.
6. Hold with your hand or clamp the top surface of the
workpiece firmly to prevent it from lifting off the table
when the bit is raised.
Fig. W
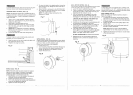
DRILLING TO A SPECIFIC DEPTH
Drilling a blind hole (not afi the way through workpiece)
to a given depth can be done two w#ys:
Workpiece method (FIG. X and Y)
1. Mark the depth of the hole on tt_e side of the
workpiece (1).
2. With the switch "OFF", bring the drill bit (2) down
until the tip is even with the mark.
3. Hold the feed handle at this position:
4. Spin the lower nut (3) down to contact the depth stop
lug (6) on the head.
5, Spin the upper nut (5) down and tighten against the
lower nut. (3)
6. The drill bit will now stop after traveling the distance
marked on the workpiece.
Depth scale method (FIG. Y)
NOTE: With the chuck up, the tip of the drill bit must be
just slightly above the top of the workpiece.
1. With the switch "OFF", turnthe feed handle until
the pointer (7) points to the desired depth on the
depth scale (4). Hold the feed handles in that position.
2. Spin the lower nut (3) down to contact the depth stop
lug (6) on the head.
3. Spin the upper stop nut (5) against the lower stop nut
and tighten.
4. The and drill bit will now stop after traveling the
distance selected on the depth scale.
Drilling a hole
Using a center punch or a sharp nail, dent the workpiece
where you want the hole. Before turning the switch on,
bring the drill bit down to the workpiece, lining it up with
the hole location. Turn the switch on and pull down on
the feed handles with only enough effort to allow the drill
to cut.
FEEDING TOO SLOWLY might cause the drill bit to turn.
FEEDING TOO RAPIDLY might stop the motor, cause the
belt or drill to slip, tear the workpiece loose, or break the
drill bit. When drilling metal, it will be necessary to
lubricate the tip of the drill bit with oil to prevent it from
overheating.
Fig.Y
4
4
6