


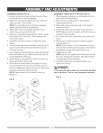
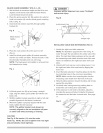
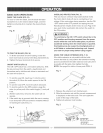

RIPFENCE(Fig,G)
1. Liftupwardontheripfencehandle(1)sotherear
holdingclamp(2)is fully extended.
2. Place the rip fence on the saw table, lowering the
front of the fence onto the table first.
3. Push down on the fence handle (1) to lock.
Fig. G
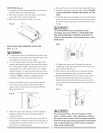
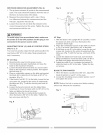
4. Remove the arbor nut (5) and outer flange (6) (Fig. I).
5. install the saw blade onto the arbor with the BLADE
TEETH POINTING TOWARD THE FRONT OF THE
SAW.
6. Install the flange (6) against the blade and thread the
arbor nut (5) as far as possible by hand. Ensure that
the blade is flush against the inner side of the blade
flange.
[a, WARNING]
To avoid possible injury and damage to the
workpiece, be sure to INSTALL THE BLADE WITH
THE TEETH POINTING TOWARD THE FRONT OF
TABLE in the direction of the rotation arrow on the
blade guard.
INSTALLING AND CHANGING THE BLADE
(FIG. H, t, J)
IAWARNINGn
o To avoid injury from an accidenta! start, make sure
the switch is in the OFF position and the plug is not
connected to the power source outlet.
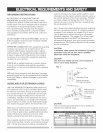
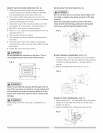
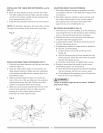
o To avoid serious injury, the rear of the table insert
must be level with the table. If the rear of the insert
is not level with the table, adjust the screw (3) in or
out until the rear of the insert is level to or slightly
above the table. To raise the insert, turn the screw
counterclockwise, to lower the insert, turn the screw
clockwise. NOTE: A rubber adjusting spacer is
provided under rear of insert for this purpose.
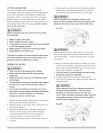
1. Remove the table insert (1) by removing the two
screws (2, 3). Be careful not to lose the rubber
spacer that is on the back screw (3) beneath the
table insert (Fig. H).
Fig. H
2
2. Raise the blade arbor (4) (Fig. I) to the maximum
height by turning the blade raising handwheel
counterclockwise.
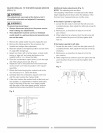
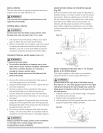
3. Place the open-end wrench (8) jaws on the flats of
the saw arbor to keep the arbor from turning (Fig. J)
and place the box-end wrench (9) on the arbor nut
(5), and turn counterc!ockwise.
12
Fig. t 4 7
7. To tighten the arbor nut, (5) place the open-end
wrench (8) on the flats of the saw arbor to keep the
arbor from turning (Fig. J).
8. Place the box-end wrench (9) on the arbor nut (5),
and turn clockwise (to the rear of the saw table).
9. Replace the blade insert in the table recess, insert
the screws through the front and rear holes and
tighten remembering the rubber washer under the
rear of the insert and leveling the rear of the insert to
the table.
Fig. J
8
[,& WARNmN¢]
To avoid injury from a thrown workpiece, blade
parts, or blade contact, never operate saw without
the proper insert in place. Use the originat installed
insert for all through sawing operations except dado
cuts. A special dado insert plate must be installed
when using a dado bJade°