


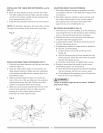
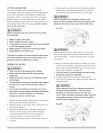
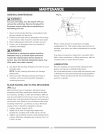

CUTTINGOPERATIONS
Therearetwobasictypesofcuts:rippingand
crosscutting.Rippingiscuttingalongthelengthandthe
grainoftheworkpiece.Crosscuttingiscuttingeither
acrossthewidthoracrossthegrainoftheworkpiece.
Neitherrippingnorcrosscuttingmaybedonesafely
freehand.Rippingrequirestheuseoftheripfence,and
crosscuttingrequiresthemitergauge.Neverusethe
twocut thesametime.
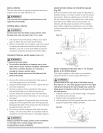
IA WARNINGI
Before using the saw each and every time, check
the following:
1. Blade is tight on the arbor.
2. Bevel angle lock knob is tight.
3. if ripping, fence knob is tight and fence is paraIM
to the miter gauge grooves.
4. Blade guard is in place and working properly.
5. Safety glasses are being worn.
The failure to adhere to these common safety rules,
and those printed in the front of this manual, can
greatly increase the likelihood of injury.
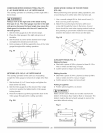
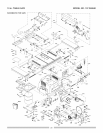
RiPPiNG (FIG. ,CA, BB)
la,WARNINGI
® Never use the miter gauge when ripping.
e Never use more than one rip fence during a
single cut.
e Keep both hands away from the blade and path
of the blade.
® The workpiece must have a straight edge against
the fence and must not be warped, twisted, or
bowed.
e Do not allow familiarity or frequent use of your
table saw to cause careless mistakes. Remember
that even a careless fraction of a second is
enough to cause a severe injury.
1. Remove the miter gauge. Secure the rip fence to the
table at the desired rip measurement.
2. Raise the blade so it is about 1/8 in. higher than the
top of the workpiece.
3. Place the workpiece fiat on the table and against
the fence so the larger portion of the workpiece
is between the blade and the fence. Keep the
workpiece about 1 in. away from the blade.
4. Turn the saw ON and wait for the blade to come up
to speed.
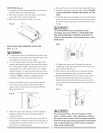
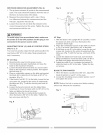
5. Slowly feed the workpiece into the blade by pushing
forward only on the workpiece section (1) that will
pass between the blade and the fence. (Fig. AA)
[,&WARNING]
AVOID KICKBACK by pushing forward on the
section of the workpiece that will pass between the
blade and the fence. Use a push stick at all times.
Fig. AA
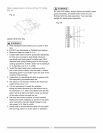
[,& WARNING ]
Always use a push stick. When width or rip narrower
than 2 in. the push stick cannot be used because the
guard will interfere.=. Use the auxiliary fence as shown
are page 20.
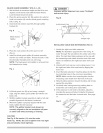
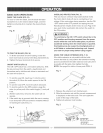
6. Keep your thumbs off the table top. When your hand
reaches the front edge of the table (2), finish the cut
with a push stick (3) (Fig. BB). You can make a push
stick using the pattern on page 2&
7. The push stick (3) should always be used during
all ripping operations. (Fig. BB)
8. Continue pushing the workpiece with the push
stick (3) until it passes the blade guard and clears the
rear of the table.
[A& DANGER]
Never attempttopulltheworkpiece backwards
during a cutting operation. This will cause
kickback and serious injury to the user can
occur. When the blade completely stops raise the
anti-kickback pawls on each side of the splitter
and slide the workpiece out.
3
Fig. BB
2
18