


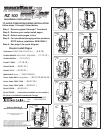
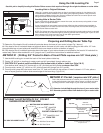
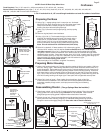

This instruction manual covers several different makes and models of plunge routers. The instructions are written for
a person with some mechanical ability. If you understand the parts and operation of a plunge router, installing the
Router Raizer is not difficult. Before beginning installation compare the illustrations and photos to your router, original
subbase or router table insert plate. Understand the location and function of both original and Router Raizer parts.
Keep all spare parts, instruction manual and templates for future reference.
Responsibility of the Owner
1. The responsibility of the owner is to follow the instructions, cautions, and warnings bellow and in the instructions
2. Know and understand the location of both original and Router Raizer parts.
3. Follow all the assembly instructions carefully.
4. Correctly adjust the components making sure the plunge action is smooth and plunge lock operates properly.
5. Carefully read and follow all notes, tips, cautions and warnings.
6. Make sure all operators of the Router Raizer know how to correctly use it.
Important: Read, understand and follow instructions to avoid personal injury.
Caution: Before and during installation of Router Raizer make sure power switch is in the off position and tool is
disconnected from power source to avoid accidental starting of the tool which may result in personal injury.
Caution: Always make sure router power switch is in the off position and disconnected from power source
before and during any adjustments to the router or Router Raizer.
Warning: Never remove or reinstall #31 dust cover or make any depth of cut adjustments from either end of
#1 mainshaft until router power switch is off, cutting tool has completely stopped rotating and tool is disconnected
from power source.
Caution: Always secure plunge lock before and during routing operations.
This warranty is your only remedy and parts are to be returned prepaid to our facility for
inspection at Router Technologies, 2729 Delaware Ave, Des Moines, IA. 50317.
This warranty gives you specific legal rights, and you may have other rights which may
vary from state to state. Any legal actions must be brought in Polk County Iowa.
ROUTER TECHNOLOGIES
LIMITED TWO YEAR WARRANTY
Router Technologies warrants the Router Raizer to be free from defects in material and
workmanship for a period of Two ( 2 ) Years from the original date of purchase to original
owner. Our responsibility under this warranty is to replace, at no cost, any part which
upon inspection at our facility is found to be defective in either material or workmanship.
This warranty does not imply that the product is fit for a particular use or application, this
warranty does not apply to parts which have been modified, altered, misused, damaged
by improper storage. It also does not cover loss of parts during use, or mechanical
adjustments which are covered in the instruction manual. In no event shall Router -
Technologies be liable for any indirect, incidental or consequential damages from the
sale or use of the product. This disclaimer applies both during and after the term of the
warranty.
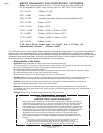
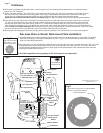
METRIC EQUIVILANTS FOR INTERNATIONAL CUSTOMERS
Note: The following metric drill bit or wrench sizes may be substituted
for all operations other than drilling hole for #30 Dust Cover Insert.
1/8” = 0.125" 3.20mm = 0.126"
3/32" = 0.093 2.4mm = 0.094
5/32" = 0.156" no metric equivilant, this hole must be drilled to 5/32"
7/32" = 0.218" 5.5mm = 0.216"
5/16" = 0.312" 8.0mm = 0.315
21/64" = 0.328" 8.3mm = 0.326" or 8.5mm = 0.334"
1/2" = 0.500" 12.8mm = 0.503 or 13mm = 0.511
11/16"= 0.687" 17.5mm = 0.689" or 18mm = 0.708"
3/4" = 0.750" 19.0mm = 0.748
# 30 Dust Cover Insert must be 0.500" use a 12.5mm bit
and sand hole to fit cover. 12.5mm = 0.492"
© 2000-2005 Router Technologies
All Rights Reserved
Page 1