


Page 8
Craftsman
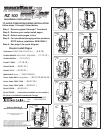
Tools Required: Two 11/16" wrench’s , phillips screwdriver, 5/16" drill bit, drill, hacksaw,
Router Raizer Parts Required: ( see page 1) #1, #7, #12, #13, #14,/( three #15 ) #16, #17, #18, #20, #21, #22, #23, #24, #26, #27,
#28, #29, ( #30,#31,#46 for router table installation ).
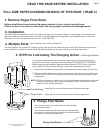
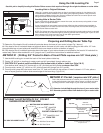
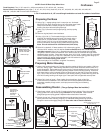
1. Using ( fig 1 ) engage plunge lock. Loosen jam nut. Unthread
height rod from base. Unhook the top of both rubber dust boots.
Grasp router handles, release plunge lock, and lift motor
housing free from base and plunge springs.
2. Using ( fig 2 ) Remove both plunge springs, and top spring
guides.
Preparing the Base
Preparing Motor Housing
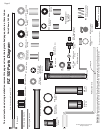
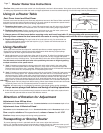
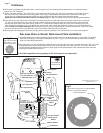
1. Select: #16 housing bushing, #17 housing bushing washer, #18 drive nut washer, #20 long
drive nut. Using ( fig 6 ) #16 bushing and #20 nut, have small shoulders which center # 17
and #18 washers. These washers are not the same. Compare washers to box A and box B
before installation. Place #17 housing bushing washer on #16 housing bushing. Place and
hold these pieces in the U shaped height rod boss found on the side of the motor housing
figs ( 1 & 6 ) Place #18 drive nut washer on #16 housing bushing, Thread #20 long drive nut
onto #16 housing bushing until finger tight. These parts will be tightened securely later.
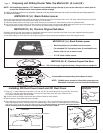
4. Using ( fig’s 3 & 4 ) ) The threaded height rod hole must be
enlarged, and drilled through the base. Drill slowly using a
sharp drill bit, for best results clamp base to a drill press
table. Center 5/16" bit in top of the threaded height rod hole
and drill completely through staying parallel with plunge post.
Note: This can be done with a hand held drill, drill slowly.
Jam Nut
Sub-base
fig 1
Height Rod
Height Knob
Dust Boot
Drill Threaded
Height Rod Hole
through base using
a 5/16" twist drill
Drill from top
3. Remove original plastic round subbase.
TOP
fig 3
fig 4
Keep Bit Parallel
to Plunge Post
Drill 5/16" through
Base
Plunge Post
Height Rod
Boss
Motor
Housing
#16 Housing
Bushing
fig 2
Top
Spring Guides
Plunge
Springs
2. Using ( fig 8, back of page ) Clean inside all post bushings. Apply a light film
of STP® motor oil treatment. This lubricants anti-friction properties provides the
smoothest possible plunge action, and helps prevent binding and chattering
during use.
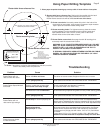
5. Select #1 mainshaft, #7 brass washer, #13 hollow spring guide
#14 steel 3/16" washer, one #15 retainer, Cut #1 mainshaft to 9, 1/8" overall length,
and debur cut end. Using ( fig 5 ) Grease both sides of #7 brass washer with included
red grease. Slide #7 down #1 mainshaft. From bottom,slide #1 mainshaft through drilled
threaded height rod hole. Place base upright, drop ( #14 ) 3/16" washer down #1 mainshaft.
Set #15 retainer, teeth up on top of #1 mainshaft. Use #13 hollow spring guide flange up to
start and push #15 retainer down mainshaft, until #15 retainer is tight.
Return # 13 hollow spring guide to box.
Check end play of #1 mainshaft, re-tighten if necessary.
Reassembling Router ( Plunge Springs Must be Installed )
#17 Housing
Bushing Washer
A
fig 6
1. Cut #1 mainshaft to 9, 1/8" overall length and debur cut end. Set aside to install later.
#7 Brass Washer
#1 Mainshaft
fig 5
#13 Hollow
Spring Guide
Flange Up
Installation
tool only
remove & store
#15 retainer clip
install teeth up
# 15 Retainer
#14 Steel
Washer
NOTE: Check Off Each Step When Done
U Shaped
Height Rod
Boss
Small
Shoulder
#17 Housing Bushing
Washer
#20 Long Drive
Nut
#18 Drive Nut
Washer
Plunge Lock Trigger
#18 Drive Nut
Washer
Small Shoulder
#20 Long Drive Nut
B
1. Stand base upright, using ( fig 2 & 8 ) replace both plunge springs. Place the original
spring guides in the top of both springs Caution: Do not assemble router without
plunge springs and spring guides. Replace rubber dust boots if removed.
2. Unlock plunge lock. Grasp router handles and guide springs into motor housing.
Slowly lower the motor housing. Aligning #1 mainshaft through #20 long drive nut.
Plunge the router and engage plunge lock. See other side to finish installation
#16 Housing
Bushing
© 2000-2005 Router Technologies
All Rights Reserved