


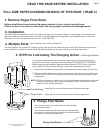
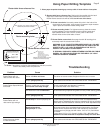
Using Paper Drilling Template
Troubleshooting
© 2000-2005 Router Technologies
All Rights Reserved
Page 6
Refer to pages 4,5,6 before using template
Additional Templates Available on Website
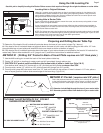
Router Raizer Access Hole
3/4" reference circle for drilling the
routers original subbase only. Table
mounted, drill 1/2" hole in table top.
.500" reference circle
for drilling table top or
insert plate.
1/2" = .500
Use this 6" scale to check accuracy when copied
Drill .500" hole
through router
table insert plate
install #30 dust cover insert
into .500" hole and press flush
with top of insert plate
NOTE: This hole must be drilled 1/2" or .500"
for #30 dust cover insert to fit properly.
Router table fence reference line
Router mounting holes
Router Raizer access hole
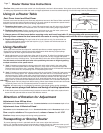
Router Raizer will not
raise or lower the router
Router Raizer will not
raise router high enough
Router becomes harder
to raise and lower
Problem Cause Solution
Router Raizer Speed Wrench
turns hard
#19 or #20 Drive nut loose
Pocket in table top or insert plate
not counter sunk deep enough
#21 lead screw has no lubrication
Router plunge posts dry
Turret stop on router improperly set
Reached maximum
plunge depth of router
The drive nut cannot rotate, Retighten the drive nut on router.
Check pocket depth and deepen if necessary.
#1 mainshaft head must rotate freely.
Re lubricate using supplied red grease or heavy wheel bearing grease.
Clean posts and lubricate with STP® MOTOR OIL TREATMENT
Locate rotating turret stop on base of router and adjustable stop
directly above. Adjustable stop must be retracted as high as possible.
Turret stop must be rotated so shortest post is under adjustable stop.
All plunge routers have a predetermined plunge stroke, the Router-
Raizer will not increase this stroke. With router fully compressed-
check amount of plunge post still visible. 1/16" to 1/4" post should
be visible.
If more than 1/16" to 1/4" of post is visible, Call 1-866-266-1293
Addition of a collet extension is required to safely run some bits.
Router plunge posts dry
Clean posts and lubricate with STP® MOTOR OIL TREATMENT
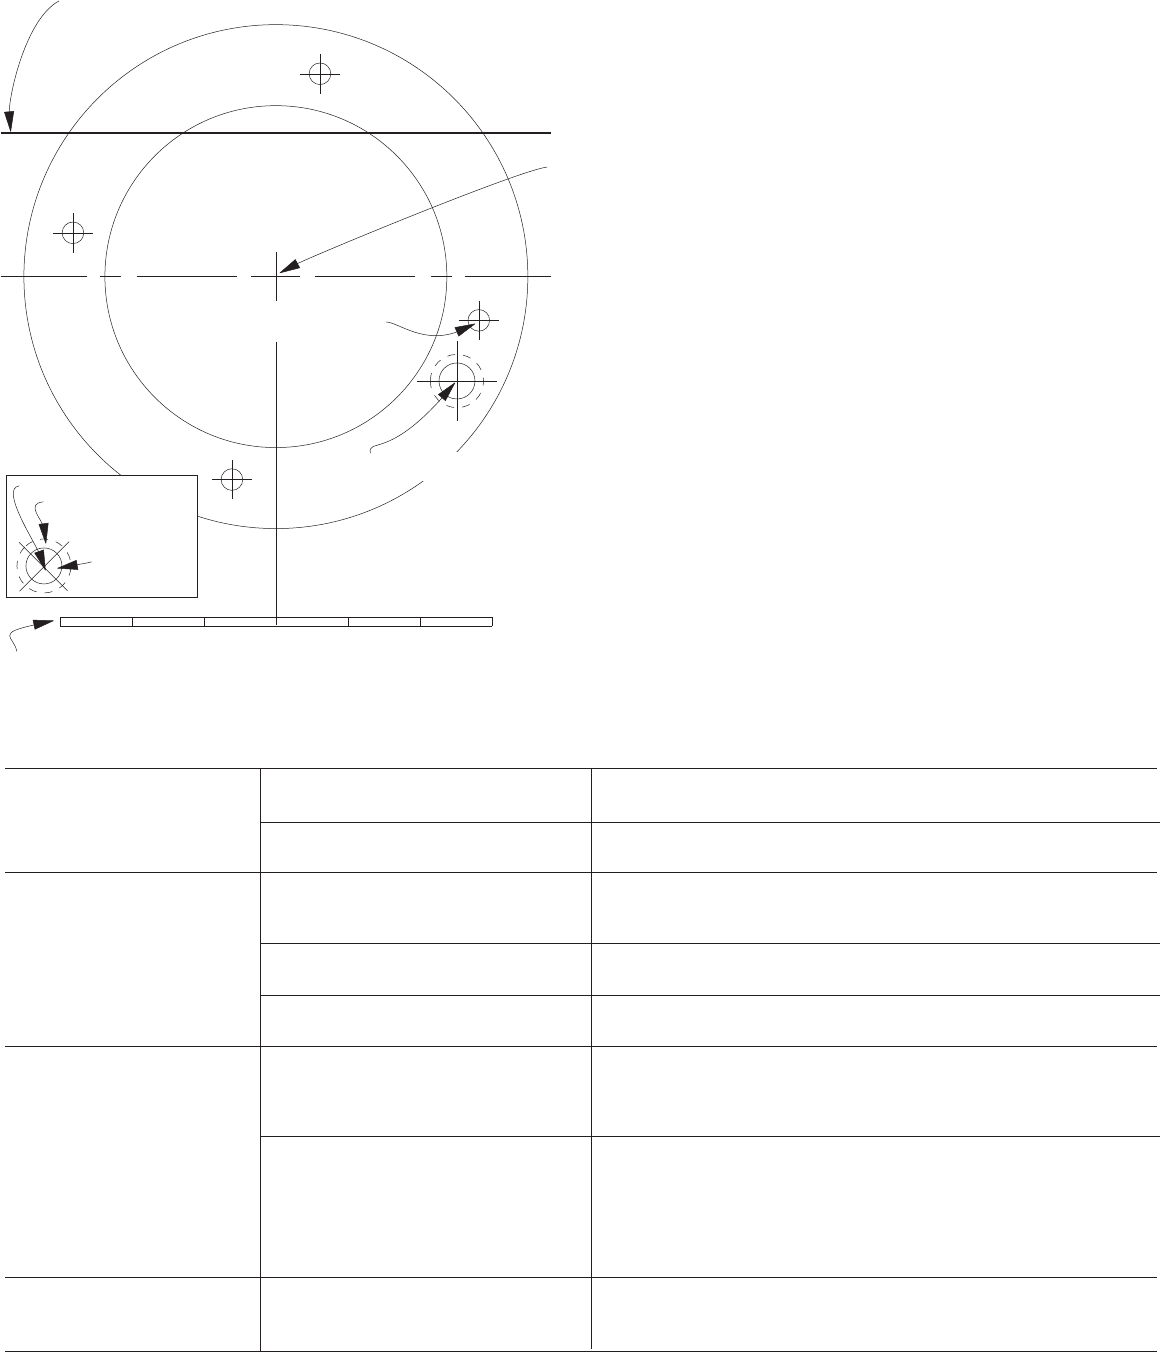
2. Router table fence reference line. Setting this line parallel with the back
edge of the router table or insert plate positions the router so the
Router Raizer access hole will be drilled out in front of the fence.
3. Center cross hairs. Accurately center this point in the hole of the
router table or insert plate, using a pencil compass or tape measure.
Tape in place and recheck before drilling holes.
1. Place paper template lettering up onto top side of router table or inset plate.
4. Router mounting holes. For highest accuracy place the routers
original subbase over the templates router mounting holes and
tape subbase down. Use a Vix bit, center punch or drill bit to
transfer holes to the router table or insert.
5. Router Raizer access hole. Use page 4 and # 46 locating pin to
accurately mark the access hole location
WARNING: IF 3/4" POCKET IS REQUIRED PAGES 4 & 5. DO NOT
DRILL 3/4" HOLE COMPLETELY THROUGH THE TABLE TOP OR
INSERT PLATE. A 1/2" HOLE IS REQUIRED IN THE TOP TO
ACCEPT THE #30 DUST COVER INSERT.
IF ORIGINAL SUBBASE IS USED BETWEEN ROUTER AND TABLE
PAGES 4 & 5. USE #46 LOCATING PIN THEN DRILL 3/4" HOLE
THROUGH ORIGINAL SUBBASE.
6" Scale. If template is copied or downloaded from web site, use this
scale to accurately check template size.
Router plunge posts dry
Clean posts and lubricate with STP® MOTOR OIL TREATMENT