


17
OPERATIONS
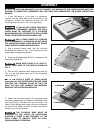
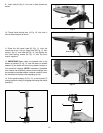
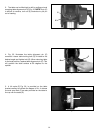
Fig. 32
Your drill press is to be used with drill bits with a shank of
5/8" or less in diameter. The following will give the
inexperienced operator a start on common drill press
operations. Use scrap material for practice to get a feel
of the machine before attempting regular work.
The use of accessories and attachments
not recommended by Delta may result in
risk of injury.
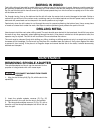
IMPORTANT: When the workpiece is long enough it
should always be positioned on the table with one end
against the left side of the column, as shown in Fig. 32.
This prevents the workpiece from rotating with the drill
bit or cutting tool, causing damage to the workpiece or
injury to the operator. If it is not possible to support the
workpiece against the column, the workpiece should
always be fastened to the table using clamps or a vise.
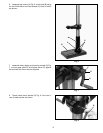
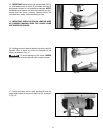
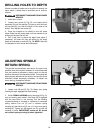
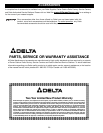
Fig. 33
D
C
A
B
INSTALLING AND
REMOVING DRILL BITS
DISCONNECT MACHINE FROM POWER
SOURCE.
1. Insert smooth end of drill bit (A) Fig. 33, into chuck
(B), as far as it will go, and then back the bit out 1/16",
or up to the flutes for small bits.
2. Make certain that the drill bit (A) Fig. 33, is centered
in the chuck (B) before tightening the chuck with the key
(C).
3. Turn the chuck key (C) Fig. 33, clockwise to tighten
and counterclockwise to loosen the chuck jaws.
4. Tighten all three chuck jaws to secure the drill bit
sufficiently so that it does not slip while drilling.
5. MAKE SURE chuck key (C) Fig. 33, is
removed from chuck before starting drill press. Your
chuck key (C) is equipped with a self-ejecting pin (D)
which helps minimize the hazard of the key being left in
the chuck.
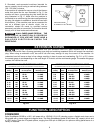
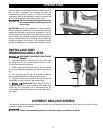
CORRECT DRILLING SPEEDS
Factors which determine the best speed to use are: kind of material being worked, size of hole, type of drill or other
cutter, and quality of cut desired.
Use the recommended speed for the drill press bit and workpiece material.