


8
ASSEMBLY
FOR YOUR OWN SAFETY, DO NOT CONNECT THE MACHINE TO THE POWER SOURCE UNTIL THE
MACHINE IS COMPLETELY ASSEMBLED AND YOU READ AND UNDERSTAND THE ENTIRE INSTRUCTION
MANUAL.
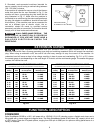
Fig. 4
Fig. 5
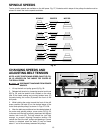
3" MINIMUM
3" MINIMUM
3" MINIMUM
3" MINIMUM
28" MINIMUM
21" MINIMUM
C
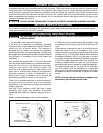
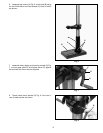
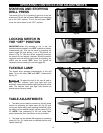
1. If your drill press is to be used in a permanent
location, the drill press base must be secured to the
supporting surface with fasteners through the two
mounting holes, (A) Fig. 3, in the drill press base.
Fig. 3
A
IF YOU DO NOT FASTEN YOUR DRILL
PRESS IN A PERMANENT MANNER, THE DRILL
PRESS MUST BE FASTENED TO A PLYWOOD
MOUNTING BOARD TO PREVENT THE DRILL PRESS
FROM TIPPING OVER DURING NORMAL USE.
USE A GOOD GRADE OF PLYWOOD
WITH A MINIMUM 3/4" THICKNESS. DO NOT MAKE
THE MOUNTING BOARD FROM PARTICLE BOARD
SINCE PARTICLE BOARD BREAKS EASILY.
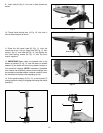
2. Use a plywood board base, with the minimum
dimensions as shown in Fig. 4 for mounting the drill
press base to a supporting surface.
3. Place the drill press base (D) Fig. 5, centered on the
supporting surface (E).
MAKE SURE THERE IS AT LEAST 3"
ON ALL FOUR SIDES OF THE BASE AS SHOWN IN
FIG. 5.
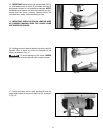
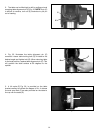
4. Drill two 3/8" diameter holes through the holes (A)
Fig. 3 in the drill press base, and in the supporting
surface (E) Fig. 5.
PLACE A PIECE OF SCRAP WOOD
UNDERNEATH THE SUPPORTING SURFACE WHEN
DRILLING THE THROUGH HOLES SO THAT THE
DRILL BIT WILL NOT DAMAGE THE MATERIAL
BENEATH THE SUPPORTING SURFACE.
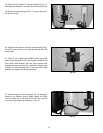
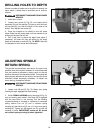
5. Fasten the drill press base to the mounting board
using the carriage bolts, flat washers, lockwashers, and
hex nuts (C) Fig. 4, furnished with your drill press. The
holes for the carriage bolt heads must be countersunk
so that the bolt heads are flush or below the bottom
surface of the mounting board.
THE PLYWOOD BASE MUST BE
SECURED TO THE FLOOR OR SUPPORTING
SURFACE IF THERE IS ANY TENDENCY OF THE
DRILL PRESS TO VIBRATE, SLIDE OR WALK
DURING NORMAL OPERATION.
D
E