


English
11
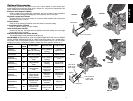
WHEN MITERING TO THE RIGHT
To increase the miter angle when mitering to the right,
move the arm to align the appropriate vernier mark
with the closest mark on the miter scale to the right. To
decrease the miter angle when mitering to the right, move
the arm to align the appropriate vernier mark with the clos-
est mark on the miter scale to the left.
WHEN MITERING TO THE LEFT
To increase the miter angle when mitering to the left, move
the arm to align the appropriate vernier mark with the clos-
est mark on the miter scale to the left. To decrease the
miter angle when mitering to the left, move the arm to align
the appropriate vernier mark with the closest mark on the
miter scale to the right.
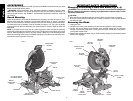
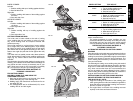
CUTTING BASE MOLDING
ALWAYS MAKE A DRY RUN WITHOUT POWER
BEFORE MAKING ANY CUTS.
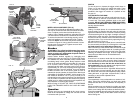
Straight 90° cuts :
Position the wood against the fence as shown in
Figure 21. Turn on the saw, allow the blade to reach
full speed and lower the arm smoothly through the cut.
CUTTING BASE MOLDING UP TO 3.5" (88.9 MM)
HIGH VERTICALLY AGAINST THE FENCE
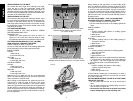
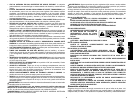
Position molding as shown in Figure 25.
All cuts are made with the back of the molding against the
fence and bottom of the molding against the base.
INSIDE CORNER:
Left side
1. Miter left 45°
2. Save left side of cut
Right side
1. Miter Right 45°
2. Save right side of cut
OUTSIDE CORNER:
Left side
1. Miter right at 45°
2. Save left side of cut
Right side
1. Miter left at 45°
2. Save right side of cut
Material up to 3.5" (88.9 mm) can be cut as described
above. For wider boards [up to 4.25" (107.95 mm)] several
minor concessions must be made.
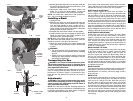
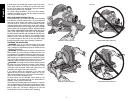
When cutting a board between 3.5" (88.9 mm) and 4.25"
(107.95 mm) in width the roller on the tip of the guard
could hang up on the workpiece. If this occurs, simply
place your right thumb on the upper side of the guard and
roll the guard up just enough to clear the workpiece, as
shown in Figure 28. Once you have cleared the workpiece,
you can release the guard and it will continue to open as
the cut progresses.
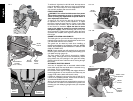
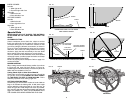
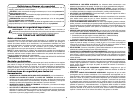
FIG. 23
CENTER MARK ON VERNIER SCALE ALIGNS WITH
DESIRED WHOLE ANGLE ON MITER SCALE
(24° RIGHT MITER)
FIG. 25
FIG. 24
1/4° VERNIER MARK ALIGNS WITH CLOSEST WHOLE
DEGREE MARK ON MITER SCALE (24 1/4° RIGHT MITER)
When mitering to the right side of a base molding wider
than 3.5" (88.9 mm) standing vertically against the fence
as in Figure 25, the saw can only cut through the board up
to 1 inch from the end of the board. Trying to cut more than
an inch will cause the saw’s gear case to interfere with the
workpiece. If you want to cut base molding between 3-1/2"
(88.9 mm) and 4.25" (107.95 mm) wide vertically follow the
directions below.
CUTTING 3.5 (88.9 MM)"– 4.25" (107.95 MM) BASE
MOLDING VERTICALLY AGAINST THE FENCE
• Position molding as shown in Figure 25.
• All cuts made with the back of the molding against the
fence
INSIDE CORNER:
Left side
1. Position molding with bottom of molding against
the base of the saw
2. Miter left 45°
3. Save left side of cut
Right side
1. Position molding with top of the molding resting on
the base of the saw
2. Miter left 45°
3. Save left side of cut
OUTSIDE CORNER:
Left side
1. Position molding with bottom of molding against
the base of the saw
2. Miter right 45°
3. Save left side of cut
NOTE: If the cut must be made somewhere other than
1" from the end of the molding: cut off the molding at
90° approx. 1" (25.4 mm) longer than your final length
then make the miter cut as described above.
Right side
1. Position molding with bottom of the molding
against the base of the saw
2. Miter left 45°
3. Save the right side of cut
A third method of making the cut necessary is to make a
zero degree miter, 45° bevel cut. Your saw can cut a bevel
6. 2" (157.5 mm) wide.
CUTTING BASE MOLDING LAYING FLAT AND USING
THE BEVEL FEATURE
• All cuts made with the saw set at 45° bevel and 0
miter
• All cuts made with back of molding laying flat on the
saw as shown in Figures 26.
• Move the left side fence out of the path of the blade
before attempting any of the following cuts.