


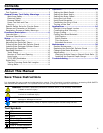


Supplemental Owner’s Manual 11
Guide Rails
Guide rails come in a variety of lengths, ranging from 32
inches to 197 inches (800mm to 5000mm). It is always best
to use the correct length rail for the cut, but sometimes it
is necessary to join two smaller rails together to make a lon-
ger rail. Guide rail connecting bars are available for joining
two or more guide rails together.
Tips for Choosing Guide Rail Lengths
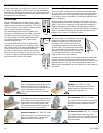
The length of the guide rail must be at least 10 inches
(250mm) longer than the cut to be performed. This is so
that the saw can be supported (and guided) at both the
beginning and end of the cut. The minimum position is when
the guide rail cam (page 7) is at the edge of the rail, but
still on the rail.
► The guide rail must extend at least 6 to 7 inches (depend-
ing on blade depth) ahead of the cut to allow the saw-
blade to be plunged without entering the workpiece.
► The guide rail must extend at least 3 inches past the cut
to allow the center of the blade to exit the workpiece.
To simplify storage or transportation, some woodworkers
prefer having two shorter rails instead of a longer rail. Other
woodworkers prefer to have single lengths for the specic
cuts they make, to minimize the frequency of needing to
join rails. Here are some tips about choosing guide rail
lengths to suit your needs:
► For frequent cutting of plywood sheets that involve both
ripping and crosscutting, dedicated guide rails of the
appropriate length may be best. This allows for switching
back and forth quickly without having to join rails.
► It’s more efcient to have guide rails of different lengths
than it is to have two guide rails of the same length. This
gives you more variety in lengths. For example, if you
had two 55 inch rails, you would have only two possible
combinations: 55 and 110 inches. However, if you had
lengths of 42 and 75 inches, for example, you would have
three combinations of lengths: 42, 75, and 117 inches.
► Shorter guide rails are easier to work with for shorter
cuts. A cabinetmaker, for example, may want dedicated
shorter guide rails for crosscutting cabinet carcase
components.
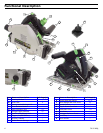
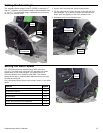
Minimum
Position at the
Start of the Cut
Center
of Blade
Minimum
Position at the
End of the Cut
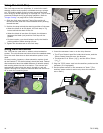
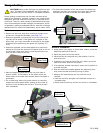
Joining Rails
Note: Do not assume that butting the two rail ends
together will result in a straight line for their entire
length. A very tiny error in the butted joint can
result in a signicant error across the length of the
joined rails. A long straightedge is the recommended
method for aligning the rails.
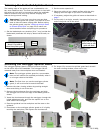
1. Insert the two connecting bars into the T-slots on one
rail (typically the longer of the two rails). Make sure the
clamping screws are facing outward.
2. Slide the second rail over the connecting bars and push
the two rails together.
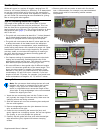
3. Place a straightedge across the joint between the two
rails, as shown to the right.
4. Center the top connecting bar across the joint, and
gently tighten the 4 clamping screws. Do not over tighten
the screws, or you may dimple the guide rail.
5. Carefully ip the guide rails over, and with the straight-
edge across the joint, tighten the bottom clamping
screws.
Lower
Connecting
Bar
Upper
Connecting
Bar
Clamping
Screws
Straightedge