


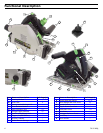


8 TS 55 REQ
Trimming the Guide Rail Splinter Guard
The leading edge of the guide rail has a replaceable, rub-
ber, zero-clearance strip. The rst time the saw is used with
the guide rail, this strip is trimmed to match the sawblade.
When trimmed to size, this strip reduces chipping and
tearout during normal cutting.
Important: If you have more than one saw that
uses the same guide rail system, you want all of the
saws to have the same cutting path. Before cutting
the splinter guard, use the “Matching Multiple Saws
to Shared Guide Rails” on page 22 to match one
saw to another before completing this procedure.
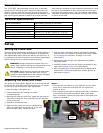
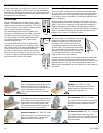
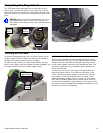
1. Set the blade depth very shallow (6 to 7 mm) so that the
blade teeth penetrate the strip by about half a tooth, as
shown.
Set the blade depth so
about 1/2 a tooth is
below the splinter guard.
Splinter
Guard
2. Set the motor speed to 6.
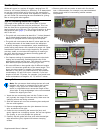
3. Place the guide rail on a stable surface with the strip
hanging over the edge so you don’t cut the table.
4. If necessary, adjust the guide rail cams as described on
page 7.
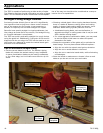
5. Cut the strip in a single, smooth, low-speed rip from one
end of the guide rail to the other.
Begin and end with
cams lined up with
guide rail ends
Installing the Outrigger Splinter Guard
The outrigger splinter guard is used to prevent chipping
on the offcut side of the sawblade. The outrigger can be
retracted away from the workpiece when not needed.
Note: The outrigger splinter guard is a consumable
item and will need to be replaced periodically when it
is no longer close to the blade.
Note: The rst time you use the outrigger splinter
guard, it will be trimmed to match the blade.
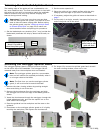
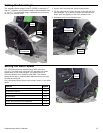
1. Remove the clear viewing window by pushing straight
down and sliding it out of the saw.
2. Remove the thumbscrew from the outrigger and slide
the outrigger on to the front edge of the blade guard as
shown.
3. Insert the thumbscrew through the outrigger, through the
height adjustment slot, and into the captive nut on the
back side of the outrigger.
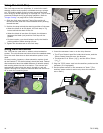
4. Place the guiderail on the workpiece and the saw on the
guiderail.
5. Press down on the outrigger splinter guard so it is lightly
touching the workpiece, and tighten the thumbscrew.
6. For longer life, remove the splinter guard and reinstall
the clear viewing window, when not in use.