


Supplemental Owner’s Manual 9
Changing the Sawblade
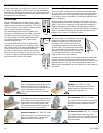
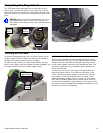
The TS55 saw features the FastFix system for easier blade
changing. The FastFix system is engaged by raising the
FastFix lever and plunging the saw down. The system
includes the following features:
► For safety, the power switch is locked out.
► The plunge depth is locked in the position shown to the
right with the arbor bolt accessible through an opening in
the blade cover.
► The arbor is locked from turning.
Sawblade Checks and Warnings
► Use only sawblades that are approved for use with the
saw and appropriate for the type of material being cut.
► Use only sawblades with a diameter of 160 mm, and an
arbor bore of 20 mm.
► Do not use a sawblade that is bent or warped.
► Do not use a sawblade with missing or damaged teeth.
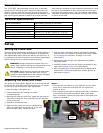
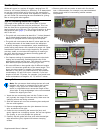
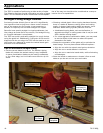
Removing the Sawblade
1. Unplug the saw for safety.
2. Although not required, you may wish to remove the
outrigger splinter guard for better clearance.
3. Set the blade depth guage to at least 25 mm, or below.
4. Raise the FastFix latch lever.
5. Press upward on the plunge lock release button and
plunge the saw down until it locks into position.
6. Using the arbor wrench (stored in the auxiliary handle)
loosen the arbor bolt by turning it counterclockwise.
7. Remove the arbor bolt and ange.
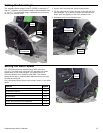
Hint: If you drop the arbor ange inside the blade
guard, remove the blade and the arbor ange should
come out afterward.
8. Lift the blade off the inboard arbor ange, and slide the
blade out of the blade guard over the top of the riving
knife.
Replacing the Sawblade
Festool offers a variety of sawblades for the many types of
cuts the saw can be used for. These range from ne cross-
cutting, ripping, and even a plastic and metal cutting blade.
Refer to “Sawblade Selection” on page 10 for information
on which blade may be best suited for the desired task.
1. Make sure the blade’s label is facing outward, and the
teeth are facing forward in the direction shown above.
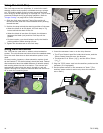
2. Insert the blade into the housing, over the top of the
riving knife, and onto the arbor.
3. Make sure the blade is properly seated on the inboard
arbor ange.
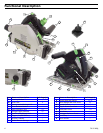
FastFix
Lever
Plunge
Release
Depth
Gauge
Arbor Bolt
and Flange
Blade
Wrench
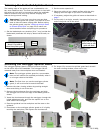
Alignment Keys
Inboard
Arbor Flange
Arbor Bolt
and Flange
Insert the
blade over the
riving knife.
4. Install the arbor ange with the alignment keys aligned
with the notches in the inboard arbor ange.
5. Firmly tighten the arbor bolt.
CAUTION! The arbor bolt is not a self-tightening
type if left too loose. Periodically check to ensure it
is rmly tightened.