


G0640X 17" Wood/Metal Bandsaw
-15-
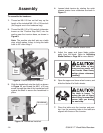
8. Attach the table to the trunnion with four M8-
1.25 x 16 hex bolts, 8mm lock washers, and
8mm flat washers.
9. With the blade teeth pointing downward, slide
the blade through the table slot.
10. Slide the blade through the upper and lower
blade guides, and mount it over the upper
and lower wheels.
11. Tighten the quick release tension lever, then
install the table insert and table pin.
Note: Keep the upper and lower blade guides
adjusted away from the blade until the blade
tracking and tension have been
adjusting
during later steps.
12. Adjust the blade tension until the mark on the
blade tension scale is between 4 and 6.
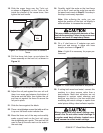
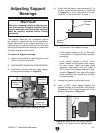
13. Attach the rear rail to the table with the two
M6-1 x 25 cap screws (see
Figure 12).
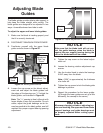
15. Install an M8-1.25 hex nut on the fence lock
lever, then thread the handle into the fence
assembly (
Figure 13). Tighten the hex nut
against the fence pivot block to secure the
handle.
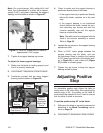
16. Thread the M6-1 hex nut onto the rail pad,
then thread the rail pad into the underside of
the back end of the fence (see
Figure 14).
17. Place the 8mm flat washer on the fence
attachment lock handle, slide it through the
hole in the fence, then thread the T-slot nut
onto the end of the lock handle threads.
14. Attach the front rail with the M6-1 x 20 hex
bolts, lock washers, and flat washers as
shown in
Figure 12.
Figure 13. Handle installed on fence assembly.
Pivot Block
Fence Lock Lever
M8-1.25
Hex Nut
Figure 14. Installed rail pad on back end of
fence.
Rail Pad
M6-1
Hex Nut
Figure 12. Rail installation.
Rear View
Front View