


-26-
G0526 6" Jointer
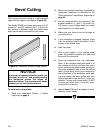
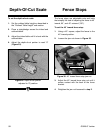
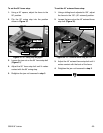
The purpose of bevel cutting is to cut a specific
angle into the edge of a workpiece (Figure 26).
The Model G0526 has preset fence stops at 45˚
inward, 90˚, and 45˚ outward (135˚). If your situa-
tion requires a different angle, the preset fence
stops can be easily adjusted for your needs.
2. Make sure your stock has been inspected for
dangerous conditions as described in the
“Stock Inspection” instructions, beginning on
page 22.
3. Set the cutting depth for your operation. (We
suggest between
1
⁄16" and
1
⁄8" for bevel cut-
ting, using a more shallow depth for harder
wood species or for wider stock.)
4. Make sure your fence is set to the angle of
your desired cut.
5. If your workpiece is cupped (warped), place
it so the concave side is face down on the
surface of the infeed table.
6. Start the jointer.
7. With a push paddle in your leading hand,
press the workpiece against the table and
fence with firm pressure.
8. Feed the workpiece over the cutterhead.
Note—If your leading hand gets within 4" of
the cutterhead, lift it up and over the cutter-
head, and place the push paddle on the por-
tion of the workpiece that is over the outfeed
table. At this point, focus your pressure on
the outfeed end of the workpiece while feed-
ing, and repeat the same action with your
trailing hand when it gets within 4" of the cut-
terhead. To keep your hands safe, DO NOT
let them get closer than 4" from the cutter-
head when it is moving!
9. Repeat steps 7-8 until the angled cut is sat-
isfactory to your needs.
To bevel cut on the jointer:
1. Read and understand Section 1: Safety,
beginning on page 3.
Figure 26. Illustration of bevel cutting results.
NOTICE
If you are not experienced with a jointer, set
the depth of cut to 0", and practice feeding
the workpiece across the tables as
described below. This procedure will better
prepare you for the actual operation.
Bevel Cutting