


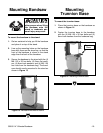

G0555 14" Ultimate Bandsaw -23-
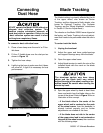
NOTICE
Whenever changing a blade or adjusting ten-
sion and tracking, the upper and lower blade
support bearings and guide-blocks must be
properly adjusted before cutting operations.
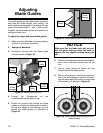
NOTICE
The blade guides should NOT have firm
pressure against the blade.
9. Tighten the cap screws to lock the blade
guides in position. Note—after the blade
guides are locked in place, the bearings
should still spin.
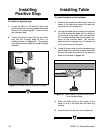
Adjusting
Positive Stop
Setting Table
Tilt Scale to 0˚
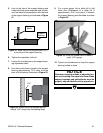
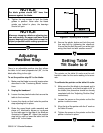
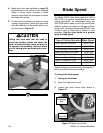
Figure 27. Squaring table to blade.
6. Secure the plastic knobs and lock the posi-
tive stop bolt by tightening the check-nut.
Ensure that the bolt does not turn while tight-
ening the check-nut with another wrench.
There is an adjustable positive stop that allows
the table to be reset perpendicular (90˚) to the
blade after tilting to the right.
To set the positive stop 90˚ to the blade:
1. Make sure the blade is correctly tensioned as
described in the “Tensioning Blade” instruc-
tions.
2. Unplug the bandsaw!
3. Loosen the two plastic knobs that secure the
table to the trunnions.
4. Loosen the check-nut that locks the positive
stop adjusting bolt in place.
5. Raise the upper blade guide assembly and
place a 6" machinist’s square or try-square
on the table next to the side of the blade as
illustrated in Figure 27. Adjust the positive
stop bolt to raise or lower the table until the
table is 90˚ to the blade.
The pointer on the table tilt scale must be cali-
brated in order for the scale reading to be accu-
rate.
To calibrate the pointer on the table tilt scale:
1. Make sure that the blade is tensioned and is
tracking correctly, and that the table is 90˚ to
the blade (this procedure should be already
completed with the “Adjusting Positive Stop”
instructions).
2. Loosen the screw on the pointer so that the
pointer is able to move.
3. Align the tip of the pointer with the 0˚ mark on
the table tilt scale.
4. Tighten the screw on the pointer so that the
pointer is locked in place.