


-18- G1022 Series Contractor Saws
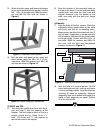
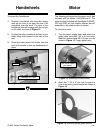
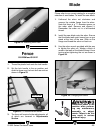
Figure 9. Assembled stand section.
3. Attach the short upper and lower side braces
to one of the assembled side panels. Use the
M8 - 1.25 x 16 carriage bolts, 8MM flat wash-
ers and M8-1.25 hex nuts as shown in
Figure 9.
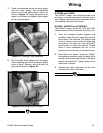
6. Note the location of the mounting holes on
the top of the stand. Turn the table saw body
upside-down and place the dust hood and
adapter assembly over the bottom of the
table saw body with the dust port flange
pointed up.
All Models:
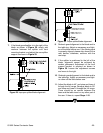
7. Align the holes at the four corners. Place the
assembled stand upside down on the table
saw body, and line up its mounting holes.
Make certain the side of the stand with the “Z
Series” label, if applicable, is on the front side
of the machine (the side with the Grizzly label
and angle scale). Secure with M8-1.25 x 19
hex bolts, 8MM flat washers and M8-1.25
hex nuts, with the dust port sandwiched
between as shown in Figure 11.
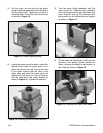
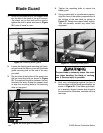
4. Bolt the other side panel to the upper and
lower braces using the M8-1.25 x 16 car-
riage bolts, 8MM flat washers and M8-1.25
hex nuts as shown in Figure 10.
G1022ZF and ZFX:
5. Take the black plastic dust hood with the 4"
port and align it with the opening in the
adapter. The bolt holes on each of the four
corners should line up. Using 10-24 x
3
⁄
8"
bolts, 10-24 nuts and
3
⁄16" lock washers to
secure the hood to the adapter.
Figure 10. Stand completely assembled.
Figure 11. Attaching the stand to the saw base.
8. With the help of a second person, flip the
entire table saw unit right side-up and move
it into its working position. Level the stand by
checking all sides for symmetry. Measure
diagonally from top to bottom and adjust the
stand so both diagonals are equal. Tighten
all of the stand bolts.
Stand
Dust Hood
Saw Body
Dust Hood
Adapter