


G1066/G1066Z/G1079 Drum Sander -11-
SECTION 4: ASSEMBLY
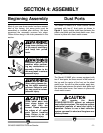
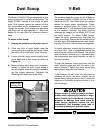
Dust Ports
Figure 2. Top-mounted 4" dust ports.
The Model G1066/G1079 Drum Sander comes
equipped with two 4'' dust ports as shown in
Figure 2. Apply double sided tape between the
plastic dust ports and the sheet metal cover, then
secure in place with sheet metal screws.
DO NOT operate the Model
G1066/G1066Z/G1079 without an adequate
dust collection system. This machine creates
substantial amounts of wood dust while in
operation. Failure to use a dust collection
system can result in short and long-term res-
piratory illness.
Beginning Assembly
Most of your new drum sander has been assem-
bled at the factory, but some parts must be
assembled or installed after delivery. We have
organized the assembly process into steps.
Please follow along in the order presented in this
section.
Keep loose clothing out
of the way of machinery
and keep hair pulled
back.
Wear safety glasses dur-
ing the entire assembly
process. Failure to com-
ply may result in serious
personal injury.
Disconnect power to the
machine when perform-
ing any maintenance or
assembly. Failure to do
this may result in serious
personal injury.
Some metal parts may
have sharp edges on
them after they are
formed. Please examine
the edges of all metal
parts before handling
them. Failure to do so
could result in injury.
The Model G1066Z also comes equipped with
two 4" dust ports, but these mount in the center of
the top and the center of the front on the sheet
metal cover. As with the other models, apply dou-
ble sided tape between the plastic dust ports and
the sheet metal cover, then secure in place with
sheet metal screws.