


-24- G1066/G1066Z/G1079 Drum Sander
G1066Z
Your new Model G1066Z Drum Sander provides
a great amount of operator control during opera-
tion. To utilize this control, you should be familiar
with the variable speed and the load meter before
using the drum sander.
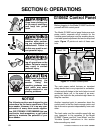
Variable Speed
The variable speed dial located on the control
panel allows you to increase the feed rate from 0-
20 FPM. The correct speed to use depends on
the type of stock you are using (hardwood vs.
softwood) and the stage of finish you are at with
that stock.
As a general rule, a slower feed rate will sand the
surface smoother, but runs the risk of burning the
wood; a faster feed rate will remove material
faster, but runs the risk of overloading the motor.
Use trial-and-error to determine the best settings
for your specific applications.
Load Meter
The load meter located on the control panel dis-
plays the current amperage draw of the drum
motor. The needle rises when you increase the
load on the sanding drums and decreases when
you decrease the load. Use this meter to avoid
overloading your machine with too heavy of a cut.
NEVER exceed 25 amps—this is the maxi-
mum that your machine can safely handle!
Since various types of stock will react differently
with various loads, use trial-and-error to deter-
mine the best settings for your applications. As a
general rule, always start with a small load and
work your way up. We recommend that you do
not push your machine to its maximum load;
instead, make multiple passes or install a coars-
er grit paper.
Operation
Under most sanding conditions, a normal cut is
no more than
1
⁄64". This depth can be achieved by
approximately
1
⁄4 turn of the handle. Excessively
heavy cuts can cause jamming, wood burning,
rapid paper wear, poor finish and belt slippage.
We recommend that wide stock be sent through
two to three times without adjusting the table
height—this is important for preventing burned
wood or ruined sandpaper. Also, turn the stock
180° to ensure an even cut. The following is the
correct start-up and operating procedure for this
model.
1. Start the dust collector.
2. Place stock on the conveyor table and turn
the table handle to raise the conveyor table
until the stock barely touches the pressure
bar.
3. Start the drum motor and the feed motor.
Pass the stock through the sander and slow-
ly raise the conveyor table while listening for
stock-to-drum contact. As soon as you hear
contact, stop raising the table and watch the
load meter (if it gets too high, immediately
lower the conveyor table). Retrieve your
workpiece by standing to the side of the
sander—NOT directly behind it.
4. Without moving the table, make multiple
passes and check your workpiece.
5. Check the sanded piece. Is the piece
smooth? Mark a squiggly pencil line on a
board and sand it to test for even sanding.
Look for uniform removal of the line. If the
line is not removed uniformly, refer to the
Adjustments section earlier in the instruction
manual.