


G1066/G1066Z/G1079 Drum Sander -15-
In addition to premature wear and failure of
sandpaper, improper drum alignment could
cause the possibility of an uncontrolled exit
of material from the machine—which could
result in damage to property or potential
operator injury.
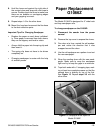
5. Stop and mark the location of the table ele-
vation handle with a felt pen or piece of tape.
In the same manner, mark the height of the
table in relation to the body of the sander.
Both of these marks will indicate this exact
table position (we will refer to it as reference
height #1). Having reference height #1
marked is crucial to all subsequent steps.
6. Lower the table exactly 2 turns. Remove the
block and re-insert it on the other side, taking
care to line it up with the front of the table just
as it was on the previous side. Raise the
table exactly 2 turns to bring it back up to ref-
erence height #1.
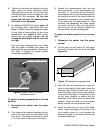
7. Set the height of that end of the drum to the
board. Rock the drum back and forth again.
It should feel and sound the same as it did on
the other end. If the sound and rolling action
are not identical, adjust the bearing block
height. Continue this procedure, going back
and forth, until both sides of the drum sound
and feel the same.
8. To adjust the rear drum, lower the table by
turning the handwheel counter-clockwise
1
/8th of a turn from reference #1. Make a sec-
ond mark. This will be reference #2 and will
be used for setting up the rear drums.
9. Repeat steps 5-6 until both sides of the rear
drum are the same. (Note: the G1066Z has
external height adjustment knobs for the rear
drum. These are located on each side of the
machine. Other than this difference, the pro-
cedure for setting the drum height is the
same.)
10. While the rear drum should always be slight-
ly lower than the front drum, the actual differ-
ence will vary depending on wood type, feed
rate, sandpaper grits, etc. Once you are
familiar and comfortable with the adjustment
procedures, you should experiment to arrive
at the best settings for your specific applica-
tion.