-22-
H8203 Professional Drill Sharpening Machine
Sharpening Operations Continued
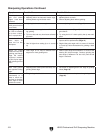
Symptom Possible Cause Possible Solution
Drill bit point over-
split and chisel
edges have been
removed.
1. Adjusting block set too low.
2. Adjusting block not secured; blocks sags,
allowing wheel to grind bit too much.
1. Regrind bit in front and rear areas, but do not lower
adjusting block so much.
2. Secure adjusting block before grinding.
Amount of back
relief ground into bit
is too small.
1. Adjusting block not low enough. 1. Lower adjusting block more (
Page 18).
Heavy grinding nois
-
es. Drill bit smokes
or tip has a black,
blue, or purple hue.
1. Too much pressure applied on drill bit dur
-
ing grinding.
2. Tip is too hot and may have been softened
too much.
1. Use less pressure (
Page 15) and take longer to
grind the bit.
2. Try using the bit. If it dulls quickly the tip was soft
-
ened.
Standard drill bit
point skips or
does not cut into
workpiece.
1. Bit has no back relief grind.
2. Heel is higher than cutting lip or is curved
up.
1. Follow instructions for grinding a back relief to
improve drill bit performance (
Page 14).
2. Regrind the point angle until it is correct. If the heel
is curved up, follow instructions for grinding a back
relief.
Notch on collet
holder will not fit into
grinding area flange
edge. Bit retains
unground material
or part of prior angle
after grinding in front
area.
1. Point angle on bit may be different from
angle set on front grinding area.
1. Select a point angle that matches or is closer to the
existing drill bit point angle. Continue grinding the
point angle (if between 118° and 135°) until the old
angle is removed.
Back relief ground
into opposite cutting
edge.
1. Adjusting block center point not directly over
grinding wheel edge.
1. Set center of adjusting block over edge of grinding
wheel (
Page 18).
Bits smoke or burn
consistently or it
takes a much lon
-
ger time to grind the
point angle or back
relief than normal.
1. The grinding wheel is dull. 1. Disconnect power and replace the grinding wheel
(Page 20).


