


Page 10SKU 43378
Operation
Warning: Avoid personal injuries. Before operating this machine, review all Safety
Warnings and Precautions listed on pages 2 through 5.
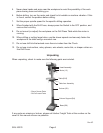
1. Loosen the Arm Locking Handle (B16) and turn the Table Crank (B8) to adjust the
Table height to accommodate the workpiece being drilled.
2. Open the Chuck and insert the drill bit in the center. Tighten with the Chuck Key (A16).
3. Secure the workpiece (and backup material) to the Table using a vise and/or clamp.
The workpiece sits on the backup material. To keep it from spinning, have it touching
the left side of the Column.
4. Adjust the height and left/right position of the Table. Tighten the Arm Locking Handle
(B16).
5. Bring the drill bit down with the Feed Handles to where the hole is to be drilled.
Make minor workpiece alignment adjustments.
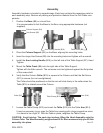
6. Plug the Motor Cable (16) plug into an electrical outlet.
7. Insert the Switch Key into the Switch (31).
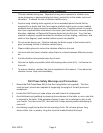
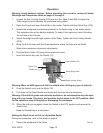
Switch (31)
Switch Key
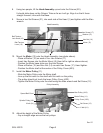
Feed Handles (24)
Depth Ring Collar
Depth Locking Screw
Warning: Wear an ANSI approved, full face shield while drilling any type of material.
8. Push the Switch up to turn the Motor ON.
9. Pull down on the Feed Handle and slowly drill the hole into the workpiece.
Warning: If the drill bit grabs and spins the workpiece, do not attempt to stop the spin-
ning with your hands. Step back, and push the Switch down to the OFF position. Wait
for the spindle to stop turning before dislodging the workpiece.
10. When the drilling is complete, press the Switch to the OFF position and remove the
Switch Key.
Keep the Switch Key in a safe place.
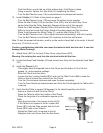
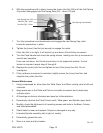
Setting the Depth Scale to Drill to a Specied Depth
During this procedure, refer to the photo on page 9.
1. Secure the workpiece to the Table.
Rev 07i