


Page 12SKU 43378
Maintenance
Warning: Before performing any maintenance to this machine, remove the line cord
from the electrical outlet.
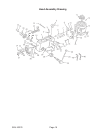
Removing the Chuck and Arbor
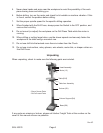
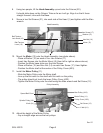
During this procedure, refer to the Pulley and Spindle Assembly Drawing.
1. Adjust the Depth Stop Collar to hold the Chuck at a depth of three inches.
2. Align the key holes in the Spindle Shaft (A13) and the Quill (A11) by turning the Chuck
by hand.
3. Insert the Wedge Drift Key (A17) into the key holes.
4. Lightly tap the Wedge Drift Key with a rubber mallet until the Arbor (A14) falls out of
the Spindle.
Place a bundled cloth or basket below the Chuck to catch it when it falls.
Installing the Chuck and Arbor
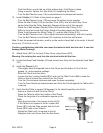
1. Using a clean cloth, wipe the tapered surfaces on the Arbor and Spindle.
2. Slide the Arbor and Chuck assembly up and into the Spindle.
At the same time, turn the assembly until the rectangular end of the Arbor slips into the
notch on the Spindle.
Warning: In the previous step, if the Arbor is not properly set in the Spindle notch, it
may y out during operation.
3. Loosen the Arm Locking Handle (B16) and raise the Table about three inches below
the Chuck.
4. Turn the Chuck sleeve clockwise to open the jaws completely.
5. Turn the Feed Handle counterclockwise and force the Chuck against the Table until
the Arbor is secure.
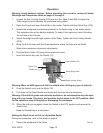
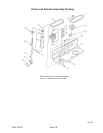
Adjusting the Feed Handle Return Quill Spring
Caution: Wear a full face shield during this procedure.
1. Loosen the Depth Locking Screw.
2. Move the Chuck to its uppermost position.
3. Turn the Depth Stop Collar clockwise until it stops.
4. Tighten the Depth Locking Screw.
This will prevent the Chuck and Arbor assembly from dropping during Quill Spring
adjustment.
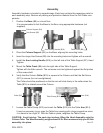
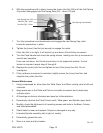
5. Insert a screwdriver in the lower-front notch of the Quill Spring Cap (39).
Hold it in place and, using a wrench, remove the (outer) Hex Nut (38) only.
Rev 07i