


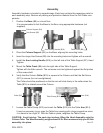
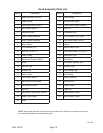
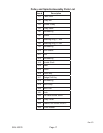
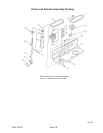
Page 11SKU 43378
2. Mark the desired hole depth on the side of the workpiece.
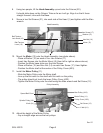
3. Loosen the Depth Locking Screw Lock.
4. Turn the Feed Handle counterclockwise to bring the tip of the drill bit down, next to the
hole depth mark.
5. Turn the Depth Stop Collar counterclockwise until it stops moving.
6. Tighten the Depth Locking Screw.
7. Turn the Drill Press ON and turn the Feed Handle counterclockwise until it drills the
hole and stops at the set depth.
8. Turn the Drill Press OFF.
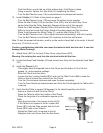
Using the Depth Scale to Measure Depth While Drilling
1. Secure the workpiece to the Table.
2. Loosen the Depth Locking Screw.
3. Adjust the Table height so that the tip of the drill bit is just above the workpiece.
4. Turn the Depth Stop Collar clockwise to “0.”
5. Tighten the Depth Locking Screw.
6. Turn the Drill Press ON and turn the Feed Handle counterclockwise to drill the hole.
While drilling, watch the pointer and scale on the Depth Stop Collar. Stop turning the
Feed Handle when the pointer and scale indicate the desired depth.
7. Turn the Drill Press OFF.
Locking the Chuck at a Specic Depth
1. Loosen the Depth Locking Screw.
2. Turn the Feed Handle counterclockwise to bring the Chuck to the desired depth.
3. Turn the Depth Stop Collar clockwise until it stops.
4. Tighten the Depth Locking Screw.
The Chuck will be held at this position when the Feed Handle is released.
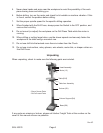
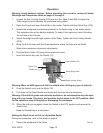
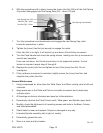
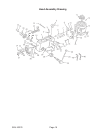
Tilting the Table
1. Loosen Set Screw (B11) under the Arm assembly with the Allen wrench.
2. Loosen the Lock Screw (B12) with the Hex Wrench.
3. Rotate the Table to the desired angle.
The scale can be used to approximate the angle.
4. Retighten the Lock Screw, then the Set Screw.
Rev 07i