


Page 11For technical questions, please call 1-800-444-3353.SKU 97896
If mounting onto a bench or other
wooden surface:
Select four (4) 3/8” Bolts, eight (8) 3/8” 1.
Washers, and four (4) 3/8” Nuts* (not
included).
*Screws and washers may be used
instead, if desired.
Place the Table Saw in the location it 2.
will be mounted in. Make a mark in the
center of each of the 4 mounting holes.
Set the Saw aside.
WARNING! Before drilling the holes, 3.
make sure that there are no electric
wires, cables, utility lines or other
obstructions in the area to be drilled in.
Drill the holes straight down, large 4.
enough to allow your mounting hardware
to t.
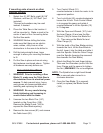
Put the Saw in place and mount using 5.
the hardware mentioned above. Tighten
all hardware securely before use.
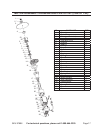
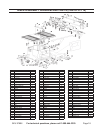
To Install A Saw Blade
WARNING!1. Prior to installing a Saw
Blade (3), make sure the Table Saw is
disconnected from its electrical power
source. To help prevent injury, heavy
work gloves are recommended when
installing and replacing the blade.
WARNING!2. Be very careful during
blade tightening and loosening to
avoid contact with the blade.
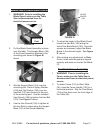
Unscrew the two Block Pins (147) 3.
located on the Guard Arm (149).
Remove the Blade Guard (146) to
expose the Saw Blade opening.
Remove the two screws (81) and remove 4.
the Table Insert (82).
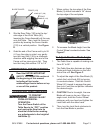
Turn Control Wheel (51) 5.
counterclockwise to raise the motor to its
uppermost position.
Turn Lock Knob (65) counterclockwise to 6.
loosen the tilt lock. Push Control Wheel
in to engage the gears and rotate it
counterclockwise to tilt the Spindle (10)
to 15 degrees.
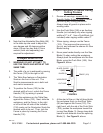
With the Open-end Wrench (167), hold 7.
the Inner Flange (4) and use the Box
Wrench (166) to loosen the Blade Nut
(1). Then remove the Blade Nut and
Outer Flange (2).
With the teeth of the Saw Blade pointing 8.
towards the front, tilt the Saw Blade to
the left, lower it into the table and slide it
onto the Spindle. Slide the Outer Flange
over the Spindle (keeping the recessed
face towards the Saw Blade.)
Attach the Blade Nut and nger-tighten. 9.
Then use the Wrenches (one to hold the
Inner Flange and the second to tighten
the Nut.) WARNING! Do not overtighten.
NOTE: The Spindle has a right-hand thread
and is secured when turned in a
clockwise direction.
Once the Saw Blade (3) is secured, 10.
install (or replace) the Blade Guard
(146).