


Page 13For technical questions, please call 1-800-444-3353.SKU 97896
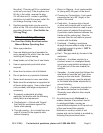
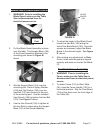
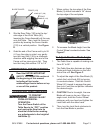
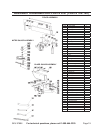
FENCE (123)
FENCE
HANDLE (132)
BLADE GUARD
FIGURE E
LONG NUT (128)
3. Slip the Rear Plate (120) onto the top/
rear edge of the Work Table (86),
lowering the Fence Assembly all the way
onto the Table. Then, lock the Fence in
position by lowering the Fence Handle
(132) to a vertical position. See Figure
E.
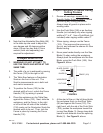
Grab the end of the Fence and try to lift 4.
it. If any free play is noted, very gently
turn the Long Nut (128) in a clockwise
direction while wiggling then end of the
Fence until no more give is felt. Then
turn the Long Nut another 1/8” to 1/4”.
OPERATING INSTRUCTIONS
Read the ENTIRE IMPORTANT
SAFETY INFORMATION section at
the beginning of this manual
including all text under
subheadings therein before set up
or use of this product.
To Raise And Lower Saw Blade
TO PREVENT
SERIOUS INJURY
FROM ACCIDENTAL
OPERATION:
Turn the Power Switch of the
Table Saw to its “OFF” position
and unplug the Saw from its
electrical outlet before making
any adjustments to the height of
the Blade (3).
When cutting, the top edge of the Saw 1.
Blade (3) should rise about 1/4” above
the top edge of the workpiece.
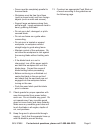
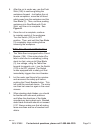
CONTROL
WHEEL
(51)
FIGURE F
LOCK KNOB
(65)
2. To increase the Blade height, turn the
Control Wheel counterclockwise. See
Figure F.
To Adjust The Saw Blade Angle
The Table Saw is capable of making cuts 1.
from 45° to 90°.
The Table Saw also features an 2. Angle
Scale and Angle Indicator on the front
side of the unit. See Figure F.
To adjust the angle of the Saw Blade (3), 3.
unlock the Lock Knob (65) by turning
it counterclockwise. Push the Control
Wheel (51) inward to engage the gear,
then turn it until the red pointer indicates
the desired angle.
CAUTION! 4. Due to its weight, the saw
Blade will lower on its own. When an
angle is set, hold the Control Wheel
stationary with one hand and tighten the
Lock Knob with the other hand.
Then, turn the Lock Knob 5. clockwise to
lock the Saw Blade in position.