


Page 14For technical questions, please call 1-800-444-3353.SKU 97896
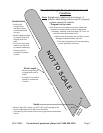
ADJUSTABLE
STOP BOLT
(85)
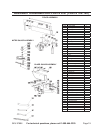
FIGURE G
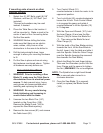
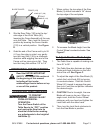
6. Note that the Adjustable Stop Bolts (85)
in the table top are used to adjust the
zero degree and 45 degree positive
stops. A 5mm hex key and a 10mm
wrench (both sold separately) are
required for adjustment.
To Adjust Width Of Cut
WARNING! DO NOT ATTEMPT TO 1.
USE THE FENCE AND MITRE AT THE
SAME TIME.
The width of a cut is achieved by moving 2.
the Fence (123) to the right or left.
The Table Saw features a Graduation 3.
Scale on the front of the unit. The
Scale’s measurements are in both inch
and metric increments.
To position the Fence (123) for the 4.
desired width of a cut, unlock the Fence
Handle (132) by raising it upward.
Place the workpiece on the Table Saw 5.
against the Fence (123). Next, slide the
workpiece, and the Fence, to the right
or left until the left side of the Indicator
(136) marks on the Graduation Scale the
desired width to be cut. Then, lock the
Fence in place by lowering the Fence
Handle (132).
Proper Placement Of Hands During
Cutting Process
Review all warnings, 1. especially the
Specic Safety Rules on page 6, before
performing any cutting procedure.
Always keep all guards in place and in
working order.
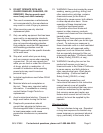
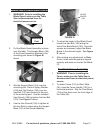
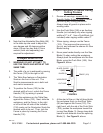
Use the Push Stick (168) or an Auxiliary 2.
Handle (not included) only when ripping
widths of 2” to 6”. Use a Push Block (not
included) when ripping widths under 2”.
When ripping, always use the Fence 3.
(123). This improves the accuracy of
the cut, and reduces the chance for Saw
Blade binding.
Never pass hands directly over the Saw 4.
Blade (3) when cutting the workpiece.
Always push the workpiece into the Saw
Blade, using the Push Stick (168). See
Figure H, below.
FIGURE H
PUSH STICK
(168)
FENCE (123)
CUT LINE
WORKPIECE
BLADE (3)
BLADE GUARD
(146)
5. At the start of the cut, the left hand holds
the workpiece rmly on the Work Table
(86) and against the Fence (123), The
right hand, with the aid of the Push Stick
(168), pushes the workpiece toward the
turning Saw Blade (3). Always keep both
hands a safe distance from the spinning
Blade (3). See Figure H, above.
REV 10h