


NOTE:
The number of secondary volumes that can be displayed in the S-VOL List at one time is limited to 1,024.
If the number of volumes defined in the disk array exceeds this limit, use the Previous and Next buttons
on the upper right of the S-VOL List to turn the pages of the S-VOL List and see the entire list.
• Previous button: Returns to the previous page of the S-VOL List. This button is selectable only when
the number of volumes defined in the disk array exceeds 1,024, which is the maximum number of
volumes that can be displayed on one page. The button is unavailable if the total number of
volumes defined in the disk array is less than 1,024.
• Next button: Turns to the next page of the S-VOL List. This button is selectable only when the
number of volumes defined in the disk array exceeds 1,024, which is the maximum number of
volumes that can be displayed on one page. The button is unavailable if the total number of
volumes defined in the disk array is less than 1,024.
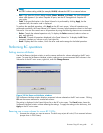
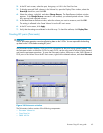
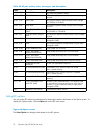
• The S-VOL List displays the following information related to S-VOLs:
• Port: Port ID (cluster and channel number) of the S-VOL
• Group (G-ID):HostgroupIDoftheS-VOL
• S-Vol Path (LUN):CU:LDEVoftheS-VOL
• Pair Num: Number of pairs
• Type: Emulation type of the S-VOL
• Capacity (MB): Capacity of the S-VOL in megabytes (MB)
• CLPR: The cache logical partition (CLPR) of the S-VOL
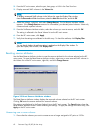
Buttons
• Set: Adds the selected S-VOL and P-VOL to the Pairsplit Volume List as an L1 pair.
• Change: Replaces the existing S-VOL of the selected L1 pair (that is, the S-VOL of the pair after
completing the operation selected in the Pairsplit Volume List) with the selected S-VOL.
• Cascade: Adds the selected S-VOL and P-VOL (node volume) to the Pairsplit Volume List as an L2
pair. To use the Cascade button, select one of the listed L1 pairs.
• OK: Adds the operation (setting) to split a pair composed of the P-VOL and S-VOL selected in
thePairsplitwindowtothePresetListontheBCmainscreen.
NOTE:
To apply the new setting displayed in the Preset List to the disk array, click Apply on the BC main
screen.
• Cancel: Cancels operations set in the Pairsplit window and closes the Pairsplit window.
To remove any volumes from the Pairsplit Volume List or the S-VOL List, select the volumes, right-click the
selected volumes, and select Delete.
Splitting pairs
1. If you
want the split S-VOLs to be identical to the P-VOLs, stop all write operations to the P-VOLs
before splitting the pairs. This ensures there are no updates to the P-VOLs while the pairsplit
operations are synchronizing the S-VOLs to the P-VOLs.
CAUTION:
The P-VOL and S-VOL are synchronized only when the pair status changes from COPY(SP)
or PS
US(SP) to PSUS. Due to the BC asynchronous update copy operations, this status
transition can take several minutes.
Business Copy XP user guide
69