


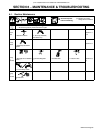
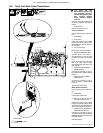

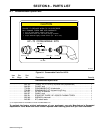

. A complete Parts List is available at www.MillerWelds.com
OM-244 013 Page 27
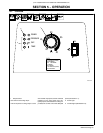
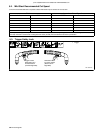
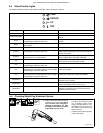
6-3. Status/Trouble Lights
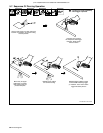
. Difficulty establishing a pilot arc may indicate consumables need to be cleaned or replaced.
V
REWOP
ERUSSERP
PUC
PMET
Light Condition Status/Possible Cause
Power On Input power is okay.
Pressure/Cup/Temp
Off When Power light is on, system is normal if these lights
are off.
Power
Flashing rate is steady for 15 seconds or until torch trigger
is pressed again, whichever comes first.
Input power below 156 volts AC, but has returned to
normal.
Power
Repetitive flashing rate of two quick cycles, then a one
second pause.
Input power is below 156 volts AC.
Pressure On No or low [below 40 psi (276 kPa)] input pressure.
Pressure
Flashing rate is steady for 15 seconds or until torch trigger
is pressed again, whichever comes first.
Regulated pressure in the unit is low. Check torch for
leaks. Check input pressure to unit is between 90 to 120
psi (621 to 827 kPa).
Pressure
Repetitive flashing rate of two quick cycles, then a one
second pause for a 15 second period.
Regulated pressure in the unit is high. Check input pressure
to unit is between 90 to 120 psi (621 to 827 kPa).
Cup
On Torch cup is loose or off. Once cup is tightened, unit
power must be cycled off and back on again.
Cup
Flashing rate is steady for 15 seconds or until torch trigger
is pressed again, whichever comes first.
No arc was established. Check consumables or torch.
Cup
Repetitive flashing rate of two quick cycles, then a one
second pause for a 15 second period or until torch trigger
is pressed again, whichever comes first.
No pilot arc established possibly due to a loss of current.
Check consumables.
Cup
Repetitive flashing rate of three quick cycles, then a one
second pause for a 15 second period or until torch trigger
is pressed again, whichever comes first.
Consumables in torch failed to separate during pilot arc
possibly due to being stuck. Check consumables.
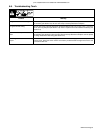
Temperature
On Power source overheated (see Section 4-2). Stop cutting
and allow unit to cool down.
Temperature
On (indefinitely) Power source temperature sensors may have failed or
ambient temperature is below -22° F (-30° C).
Temperature
Flashing rate is steady (indefinitely). Power source temperature sensor provided inaccurate
readings, but returned to normal. Unit power must be
cycled off and back on again.
For system troubleshooting see Section 6-7 and Section 6-8.
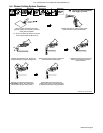
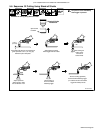
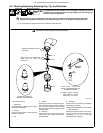
6-4. Checking Shield Cup Shutdown System
1 Torch Shield Cup
Turn Power On and loosen shield
cup. If shutdown system works
properly, Cup light comes on. If not,
immediately turn Off power and
have Factory Authorized Service
Agent check unit.
If system works properly, retighten
cup and reset power.
Ref. 801 300-A
1
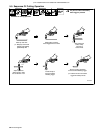
. Power must be reset whenever the cup
shutdown system is activated. Always
turn Off power when changing or
checking consumables. Do NOT
overtighten torch shield cup. Gently
finger tighten cup onto torch.