


12
5. Remove the worn blade and install the new
blade, making sure the teeth face downward
where they pass through the slot in the
table.
6. Use the tension handwheel to tighten the
tension on the blade.
7. Proceed with “Blade Tension” and “Blade
Tracking” before operating the band saw.
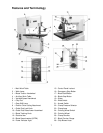
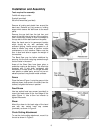
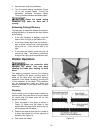
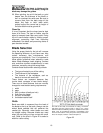
Blade Tension
Rotate blade tension handwheel to the right to
increase tension on the blade, to the left to
d
ecrease tension on the blade. Initially, set the
blade tension to correspond to the width of your
blade, as indicated on the tension gauge (Figure
6). As you become familiar with the saw, you
may find it necessary to change the blade
tension from the initial setting, depending on the
width of the blade as well as the material being
worked.
Keep in mind that too much or too little blade
tension can cause blade breakage and/or poor
cutting performance.
If the band saw is not to be used for a period of
time, release tension on the blade – this will
prolong its life. First make a note of the specific
tension setting for that blade. The tension can
then be re-established quickly when operations
are resumed.
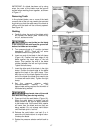
Blade Tracking
1. Disconnect machine from power source.
2. Open the top blade wheel doors.
3. Move the gear shift lever into neutral
position (straight down).
4. Move the upper and lower blade guides
away from the blade (see “Blade Guides”).
5. Rotate upper blade wheel by hand,
observing the position of the blade as it
rides upon the wheel. The blade should
track as near the center of the wheel as
possible.
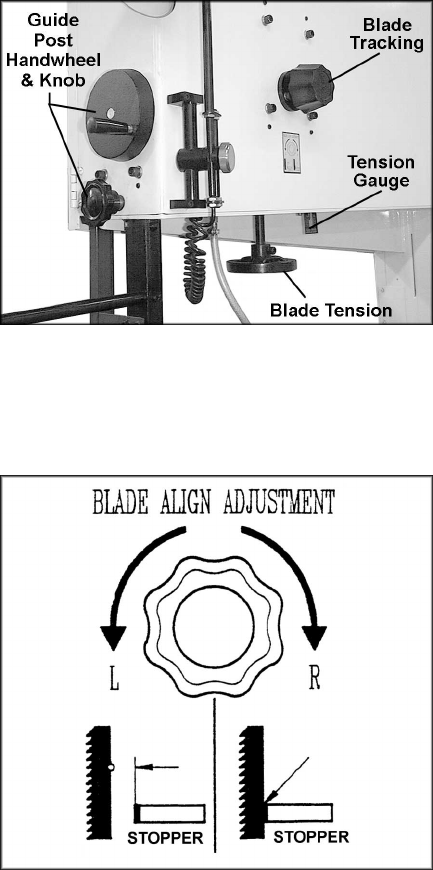
6. If the blade does not track properly, rotate
the blade tracking knob (Figure 6) clockwise
to move the blade toward the front of the
wheel (as viewed from the front of the saw)
or counterclockwise to move the blade
toward the rear of the wheel. NOTE: This
will also move the blade away from or
toward the stoppers on the blade guide
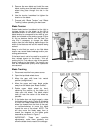
assemblies, as shown in Figure 7.
IMPORTANT: These are sensitive
adjustments; make them gradually and
allow the blade time to react to the changes.
Figure 6
Figure 7