


14
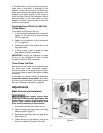
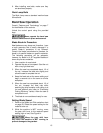
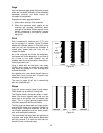
Squaring Work Table with Blade
1. Place the table in horizontal position with “0”
on the scale (Figure 11).
2. Place a machinist’s square on the table and
against the blade as shown.
3. If the square is not flush against the blade,
loosen the screw below the table (Figure 11)
with a 26mm wrench (provided).
4. Tilt the table as needed until the square is
flush with blade. Retighten the screw.
5. Make sure the pointer is set at “0” on the
scale. If it needs slight adjustment, loosen
the screw and shift the pointer until it aligns
with “0”. Re-tighten the screw.
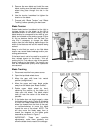
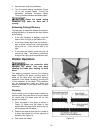
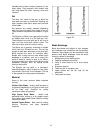
Auxiliary Table
1. After the main work table has been set
perpendicular to the blade, use a straight
edge to confirm that the auxiliary table is
level with the main table, as shown in Figure
12. If the auxiliary table is not level with the
main table, make adjustments as follows.
2. To tilt the auxiliary table left or right, loosen
the screws (A, Figure 12) and turn one of
the stops (B, Figure 12) as needed. Re-
tighten screws (A, Figure 12) securely after
adjustment.
3. To adjust the table front to back, loosen
screws (C, Figure 12). Re-tighten screws
securely after adjustment.
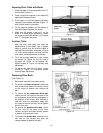
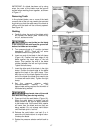
Replacing Drive Belts
(See Figure 13)
1. Disconnect machine from power source.
2. To remove the motor drive belt, loosen the
four screws at the base of the motor. Lift up
on the motor to slacken and remove the
belt.
3. To remove the air compressor drive belt,
loosen the four hex nuts on the base of the
air compressor and slide the compressor in
the direction of the motor. After installing a
new belt, slide the compressor away from
the motor to tension the belt, and re-tighten
the four hex nuts.
4. To remove the gearbox drive belt, loosen
the hex nuts on the base of the lower
variator, and slide the lower variator upward
to slacken and remove the belt.
5. To remove the variator belt, loosen the four
hex nuts on the variator and push the
variator upward to slacken the belt.
Figure 11
Figure 12
Figure 13