


17
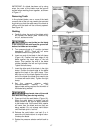
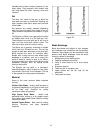
IMPORTANT: If a blade has been cut by using
snips, the ends of the blade must be ground
square before welding them together, as shown
in Figure 17.
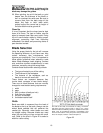
Removing Teeth
In fine pitched blades, one or more of the teeth
on each side of the cut may need to be removed
by grinding so that the weld area of the blade is
uniform and the teeth will be uniformly spaced.
See Figure 16.
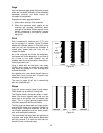
Welding
4. Carefully clean the ends of the blade which
will contact the welder jaws. Remove any
dirt, oil, scale and oxide.
Any rust (oxide) on the blade
in the vicinity of the weld must be ground off
before the blade can be welded.
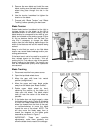
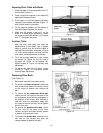
5. Turn pressure knob to “0” position (pointed
downward). NOTE: There will be some
resistance when turning the knob.
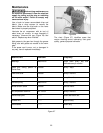
6. Insert one end of the blade in the left clamp
(Figure 18). Position the back edge of the
blade against the back edge of the left
clamp. Then position the end of the blade
midway between the left and right clamps.
Tighten the left clamp.
7. Insert the other end of the blade in the right
clamp. Position the back edge of the blade
against the back of the right clamp. Then
butt the end of the blade against the other
end of the blade (the blade ends need to be
in contact with each other). Tighten the right
clamp.
8. Set the pressure selector switch
(counterclockwise rotation) to the
approximate setting required for the width of
the blade being welded.
Keep hands clear of the weld
area and the clamp jaws during welding.
9. Press and hold the weld button (Figure 18).
When the weld button is pushed, the left
clamp moves to the right to apply pressure
to the blade ends. At the same time, sparks
will come from the blade ends as they are
being welded. Do not release weld button
until the blade joint is “red hot.”
10. Release the weld button, and wait 3 or 4
seconds until blade returns to original color.
Unclamp the blade.
11. Rotate the pressure selector switch back to
“0”.
Figure 17
Figure 18