


OPERATION
– 24 –
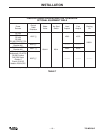
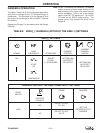
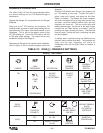
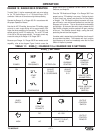
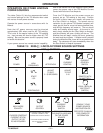
TABLE 9: K930-[ ] / RANGER 8 (WITH THE K892-1) SETTINGS
K930-[ ] SETTINGS
POWER
HIGH
FREQUENCY
AFTERFLOW
CURRENT
CONTROL
CURRENT
CONTROL
SWITCH
ON
START
- OR -
CONTINUOUS
ADJUST
TO SUIT,
5 - 55 SECONDS
ADJUST
TO SUIT
0-10
REMOTE (WITH
AN AMPTROL)
LOCAL (WITH AN
ARC START
SWITCH)
2
A
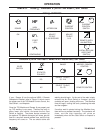
RANGER 8 (WITH THE K892-1 REMOTE KIT INSTALLED) SETTINGS
IDLER
SWITCH
STICK/TIG
POLARITY
RANGE
CONTROL AT
WELDER / REMOTE
CONTROL
HIGH
DC-
AC
SELECT TO SUIT,
50 - 210
SELECT TO SUIT,
50-175 REMOTE CONTROL
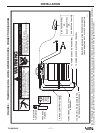
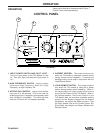
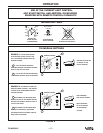
If your Ranger 8 has the optional K892-1 Remote
Receptacle installed, refer to Figure 9, which covers
the proper use of the TIG Module Current Control, Arc
Start Switch, and Amptrols.
Once the TIG Module and Ranger 8 are properly set
up, TIG welding is very easy. Position the torch in
place, lower your helmet, and press the Arc Start
Switch or Amptrol. The power source contactor (or
the optional TIG Module contactor) will close, gas will
flow for a one-half second preflow time, and the high
frequency will come on. The arc should strike and
welding should begin. At the end of the weld, simply
release the Arc Start Switch or Amptrol, and the
contactor will open, shutting off the arc. The Afterflow
time will begin, cooling the torch, protecting the weld
and the tungsten.
If another weld is started during the Afterflow time,
there will be no preflow time delay. The contactor will
close and the high frequency will come on
immediately when the Arc Start Switch or Amptrol is
pressed.
HF
TIG MODULE