


P 18/ 25
Repair
ASSEMBLING
Fig. 55
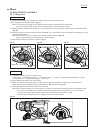
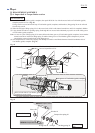
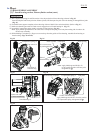
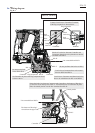
(5) Set Compression spring 14 and Flat washer 14 to the projection of Inner housing as drawn in Fig. 55.
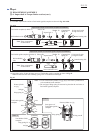
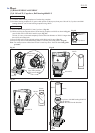
Insert Guide plate and Piston joint into Piston cylinder, and then pass the pole of Swash bearing 10 through Piston joint.
(Fig. 56)
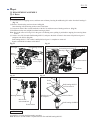
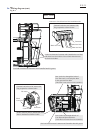
(6) Assemble Inner support complete to Inner housing with two M4x25 Hex socket head bolts. (Refer to Fig. 47)
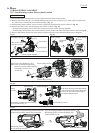
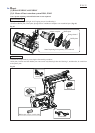
(7) Make sure that the gear teeth of Clutch cam A engage those of Swash bearing 10. (Fig. 57)
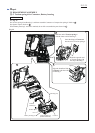
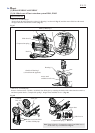
(8) Assemble Compression spring 4 and Lock plate to Gear housing. (Fig. 58)
Note: Apply Makita grease RB No. 00 to the end of Compression spring 4 on Lock plate mating side in order to do
the next step smoothly.
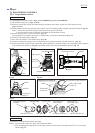
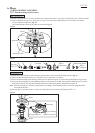
(9) While holding Lock plate by a finger so as not to drop from the guides of Gear housing, assemble Gear housing to
Inner housing. (Figs. 58 and 59)
[3] DISASSEMBLY/ASSEMBLY
[3]-7. Swash bearing section, Piston cylinder section (cont.)
Fig. 57
Fig. 59
Fig. 58
Fig. 56
Compression spring 14
Guide plate Inner housingPiston cylinder
It is not necessary
to position this hole.
Flat washer 14
Projection of
Inner housing
Clutch cam A
Gear housing complete Compression spring 4 Lock plate
Correct assembling
Swash bearing 10
Note: Apply Makita grease RB No. 00
to the specific portions of Piston joint
designated by .
Pole of
Swash bearing 10
Piston joint
Apply Makita grease RB No. 00 to the portion
of Compression spring 4 designated by .
Guides of Gear housing