


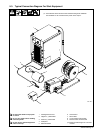

OM-230 009 Page 23
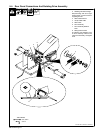
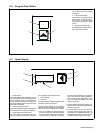
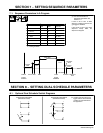
6-6. Program Push Button
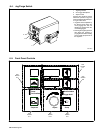
1
3
Program
2
1 Program Display
The number of the active program
is displayed.
2 Program Push Button
Press button to activate program
select feature. To change the pro-
gram number, press the Program
push button and rotate the Adjust
control.
3 Program Push Button LED
The LED lights to indicate the Pro-
gram push button is active.
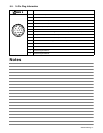
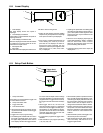
6-7. Upper Display
5
2
V/Trim Time (sec)
1
4
3
1 Upper Display
The upper display shows voltage/trim or time.
The unit displays both preset and actual arc
voltage. When the unit is in a welding state, ac-
tual arc voltage is displayed. The upper dis-
play shows welding sequence time when the
Time LED is illuminated.
2 Upper Display Push Button
Press and hold button to adjust or display weld
time. Release button to display voltage/trim.
3 Upper Display Push Button LED
The upper display push button LED illumi-
nates to indicate that information displayed
can be changed by the Adjust control.
4 Volts/Trim LED
5 Time LED
The LEDs below the display illuminate to indi-
cate which value is being shown.
At any time while welding, the unit permits the
adjustment of the weld sequence voltage/trim
while continuing to display actual arc voltage.
• If the unit is displaying a welding sequence
that can be timed, the welding time display
mode is entered by pressing the upper dis-
play push button repeatedly until welding
time is the active parameter in the upper dis-
play. At idle, the upper display toggles be-
tween showing weld voltage/trim or weld
time, with subsequent presses of the upper
display push button.
• The unit defaults to displaying welding volt-
age/trim when a welding sequence display
mode is first entered.
• If the weld sequence has a time set (as in
spot time) and the trigger is held, after the
weld program is completed, ERR TRG 1 will
be displayed to indicate the weld program is
complete. Release trigger to clear error.