


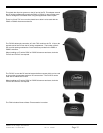
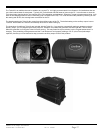

Copyright 2003 OutBack Power Systems, Inc. FX & VFX “E” Series Inverter/Charger System Installation & Programming Manual
19009 62
nd
Ave NE, Arlington WA 98223 USA
Tel 360 435 6030 Fax 360 435 6019 Rev 7.0 07/02/04
Page 23
BATTERY CHARGING INSTRUCTIONS
Keeping your battery bank healthy is very important. Although a battery bank may last for over 10 years if properly cared for, it can also be ruined in
less than a month if neglected. Since the batteries are the lifeblood of the system and represent a large percentage of the cost to the consumer,
keeping them healthy is necessary.
Battery Charging Set Points
In order to make sure the batteries stay healthy, they must never be discharged too much and should be regularly charged back to
near-full capacity. (Full capacity is only achieved by equalizing the batteries. Check with the battery manufacturer to see how often
your batteries should be equalized.) It is necessary for the system operator to gather some information from the battery manufacturer.
This information should include the following…
• The ‘Absorb’ Voltage
• The ‘Float’ Voltage
• The ‘Equalize’ Voltage
• The Recommended Depth of Discharge (DOD) of the batteries
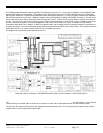
These ‘Absorb’, ‘Float’, and ‘Equalize’ voltage set points should be programmed into the FX through the MATE (see page 46).
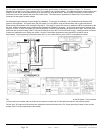
Programming the ‘Absorb Time Limit’ is tougher and requires some experimenting and calculations. We will be assuming that the
generator or the utility grid will be the only device charging the batteries. A general rule for knowing when the batteries are fully
charged and the absorption cycle can be stopped is the formula C/40. C is your battery bank capacity which you divide by 40. So, take
the total amp-hour capacity of the batteries and divide it by 40. The resulting number is the ‘DC current’ at which the batteries are fully
charged. Write this number down. Next, divide the ‘DC Current’ by the number of FX’s that will be charging the batteries. This is your
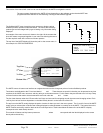
new ‘DC Current’. Next, do a calculation to find the ‘AC Current’ needed to produce this ‘DC Current’ by following this formula…
AC Current =
Voltage)Input (AC
Voltage) (Absorb x Current) (DC
(Round this number down to the nearest integer)
Next, through the MATE, follow the path MAIN / ADV / (any button) / PASSWORD (141) / FX / CHGR / DOWN / DOWN. The screen
should show “Absorb Time Limit’. Set this value arbitrarily high, say 4 hours.
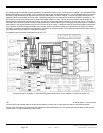
To set the correct time in the ‘Absorb Time Limit’ the user must perform the following experiment on the system. First, the user should
discharge the batteries to the recommended depth of discharge and then connect the AC input to all FX’s charging the batteries and let
the FX’s charge the batteries. The user must carefully watch for when the FX’s reaches the ‘Absorb Setpoint’ voltage and record the
current time. Next, the user should watch the ‘Charger Current’ screen found by following the path MAIN / STATUS / FX / METER and
pressing DOWN four times. When the value on the screen matches the ‘AC Current’ value that was calculated, then again record the
current time. The appropriate ‘Absorb Time Limit’ for the system is the difference between these two times (round this value up if
necessary). Follow the path MAIN / ADV / (any button) / PASSWORD (141) / FX / CHGR / DOWN / DOWN to get to the ‘Absorb Time
Limit’ screen and use the INC or DEC buttons to adjust the value. If there is another source (solar, wind, hydro, etc.) charging the
batteries, then the ‘Absorb Time Limit’ can be reduced. It is up to the user to decide or the System Design Specialist to set the ‘Absorb
Time Limit’ if this is the case.
Battery Charging Operation
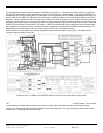
The FX’s battery charger includes five stages. The first stage, BULK, raises the battery voltage to the ‘Absorb Setpoint’. The second
stage, ABSORB, sustains the battery voltage at the ‘Absorb Setpoint’ for the ‘Absorb Time Limit’. The charger then goes into the third
stage, SILENT mode (no charging), until the battery voltage drops to the ‘Float Setpoint’. This fourth stage, FLOAT, sustains this
battery voltage for the ‘Float Time Period’. The charger then goes into ‘Silent’ mode again until the battery voltage drops to the ‘Refloat
Setpoint’. This fifth stage, REFLOAT, will start another FLOAT charge. There are additional screens for “Equalize Setpoint’ and
‘Equalize Time Period’. An equalize charge must be manually started and should be performed once every three months. The time
limits that it spends in the various stages are adjustable to provide control and maximize the performance of the battery charger and
battery system.