


10 Pelco Manual C573M-D (11/03)
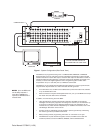
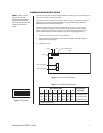
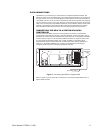
1. Connect the remote video sources to the input BNC connectors on the rear panel of
the MDA (refer to Figure 33). Refer to Table C for video coaxial wiring distances. (Note
that when wiring inputs it is good installation practice to label each video input in case
troubleshooting is required.)
2. Connect cables from the output BNC connectors on the MDA’s rear panel to the input
connectors of monitors, VCRs, switchers, etc. (refer to Figure 33). Refer to Table C for
video coaxial wiring distances.
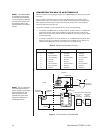
Although the MDA does not pass Coaxitron signals, it can be used with Coaxitron products
—such as the CM6700, CM6800, and CM9760-CXTA—by installing the MDA after the
Coaxitron equipment (refer to Figure 45 and to Figure 46).
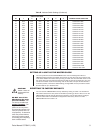
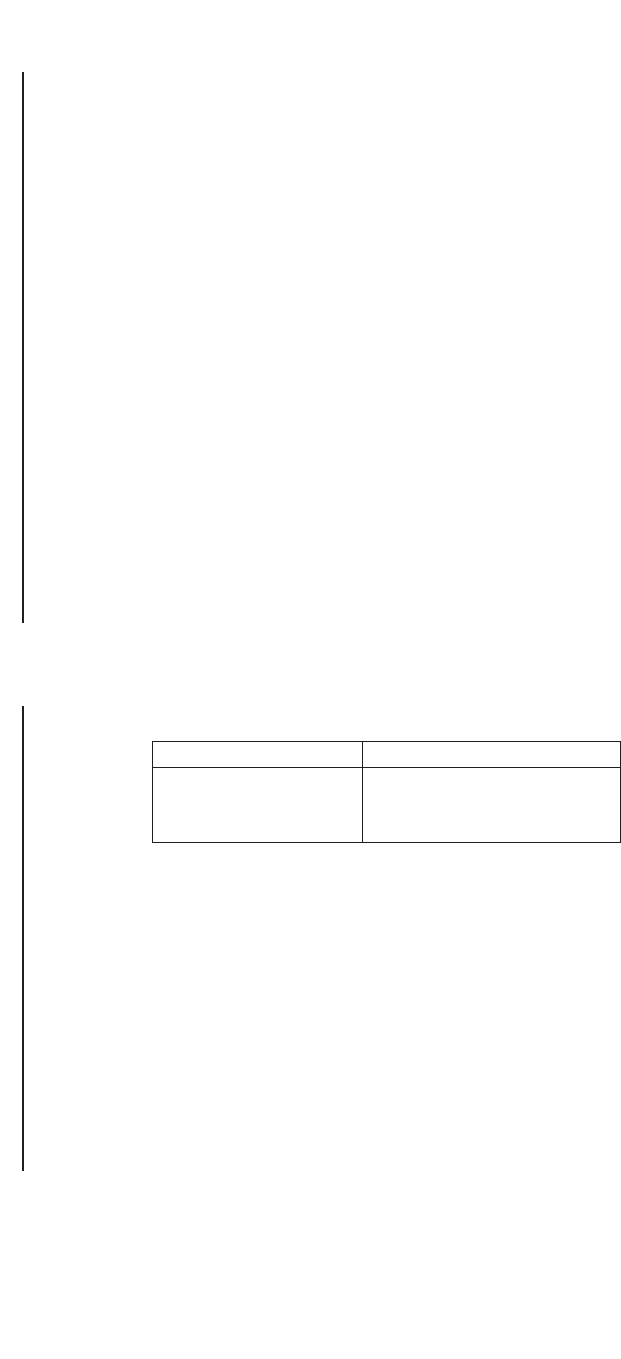
Table C. Video Coaxial Cable Wiring Distances
Cable Type* Maximum Distance
RG59/U 750 ft (229 m)
RG6/U 1,000 ft (305 m)
RG11/U 1,500 ft (457 m)
*Minimum cable requirements:
75 ohms impedance
All-copper center conductor
All-copper braided shield with 95% braid coverage
CLEARING TITLE/TIME/DATE TEXT DISPLAY ON ALL CHANNELS
You can clear title/time/date text on all CM9760-MDA channels using a DIP switch method.
To do so, proceed as follows:
1. Turn off the MDA.
2. Set the MDA to unit ID 33:
a. Set DIP switches 1, 2, 3, 4, and 5 to the OFF position.
b. Set DIP switch 6 to the ON position.
3. Turn on the MDA.
A 30-second timer starts.
4. Before the 30 seconds elapses, change the unit ID to a setting other than unit ID 33
using the appropriate DIP switch settings.
After 30 seconds have elapsed, the MDA checks whether the unit ID is different from
the initial setting of 33. If the unit ID has changed, the MDA title/time/date text display
is cleared.
Note the following:
• The title/time/date text can be programmed again using the PC or a CM9760-KBD,
KBD200A, or KBD300A keyboard.
• If the MDA must be set back to unit ID 33, set the unit ID after the title/time/date text
has cleared.
VIDEO CONNECTIONS