


Pelco Manual C573M-D (11/03) 19
The fields (or items to be set) are defined as follows:
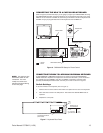
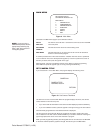
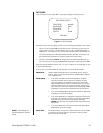
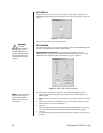
POSITION The first item to set is the display position, which is digitally selected
DISPLAY and controlled by the keyboard. To move the output display, position
the cursor at item 1. The “1” flashes. Press the joystick right to choose
the item. Press the joystick up/down and left/right to position the
display on the monitor. See Figure 35 for the output display. At least
one output display must be on and you must use this output on a
monitor to see its position. To return to the Camera Display Menu after
setting the position display, press the OPEN or CLOSE key.
BRIGHTNESS To set brightness, press the joystick down to position the cursor at the
brightness item on the menu. Use the OPEN key to increase
brightness and the CLOSE key to decrease it. Brightness numbers
range from 1 (darkest) to 8 (brightest). Brightness changes on the
menu as you change the number.
ENABLE TITLES You toggle this field on/off by placing the cursor on the selection and
pressing the OPEN key. You can activate or deactivate the titles on a
camera-by-camera basis. The selection immediately appears on the menu.
ENABLE TIME You toggle this field on/off by placing the cursor on the selection and
DATE pressing the OPEN key. You can activate or deactivate the time and
date on a camera-by-camera basis. The selection immediately appears
on the menu.
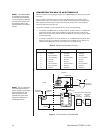
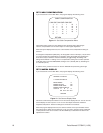
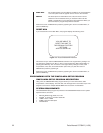
ENABLE VIDEO Use this field to direct the alphanumeric data (text) to the desired
DISPLAY output. In the example in Figure 12, outputs 1 and 3 will have alpha-
OUTPUT numeric information while outputs 2 and 4 will not. To change the
settings, position the cursor at locations A, B, C, or D and press the
OPEN or CLOSE key to turn the settings ON or OFF.
As shipped from the factory, the four outputs for the title, time, and date display are ON.
Brightness is set to level 5.
Position the cursor at RETURN and press the joystick right to return to the Main Menu. You
can also press the NEAR key to exit this menu.
NOTE:
At least one output
display must be turned on
and you must use this out-
put on a monitor to see its
position.