


12
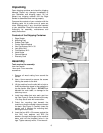
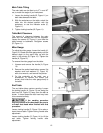
Main Table Tilting
The main table can be tilted up to 5
o
in and 45
o
out, to match the angle of your workpiece.
1. Loosen the locking handle (B, Figure 11) on
both sides beneath the table.
2. With the workpiece on the table, swivel the
table into the desired position with the
workpiece, or use the indicator scale (C,
Figure 11).
3. Tighten locking handles (B, Figure 11).
Table/Belt Clearance
The amount of clearance between the main
table and the sanding belt can be adjusted.
Loosen the screws (D, Figure 11) and slide the
table forward or backward. Re-tighten screws
(D, Figure 11).
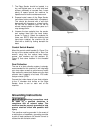
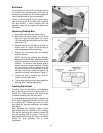
Miter Gauge
To adjust the miter gauge, loosen the handle (A,
Figure 12). Rotate the miter gauge body until the
desired angle on the scale lines up with the
notch in the pointer (B, Figure 12). Tighten the
handle (A, Figure 12).
To remove the miter gauge from the table:
1. Unscrew and remove the handle (A, Figure
12).
2. Remove the socket head button screws, flat
washers and lock washers (C, Figure 12)
with a hex wrench, and remove the pointer.
3. On the underside of the table, use a
screwdriver to remove the screw (not
shown) that holds the miter gauge body to
the table.
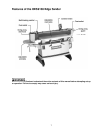
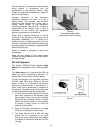
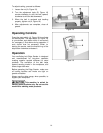
End Table
The end table allows contour sanding. Loosen
the locking handle (A, Figure 13) and swing the
dust hood (B, Figure 13) away from the belt as
shown. In some cases the dust hood may have
to be removed entirely.
If the sanding procedure
requires removal of the dust hood, be sure to
re-install dust hood when finished with that
procedure.
Loosen locking handle (C, Figure 13) to raise or
lower the end table. Tighten locking handle after
adjustment.
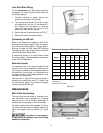
Loosen locking handle (D, Figure 14) to tilt the
end table. Tighten locking handle after
adjustment.
Figure 11
Figure 12
Figure 13
Figure 14