


9
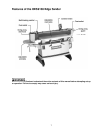
7. The Edge Sander should be located in a
dry, well-lighted area, on a solid and level
surface, preferably a concrete floor. Leave
plenty of space around the machine for
operations and routine maintenance work.
8. Exposed metal areas of the Edge Sander
have been factory coated with a protectant.
This should be removed with a soft cloth
dampened with kerosene or mineral spirits.
Do not use an abrasive pad. Do not let
solvent contact plastic or rubber parts as it
may damage them.
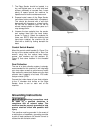
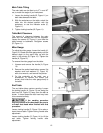
9. Unscrew the two eyebolts from the sander
and replace them with the hand knobs,
shown in Figure 4. Retain the eyebolts for
future use. NOTE: After the mounting feet
have been installed, the machine can be
lifted with a forklift by forking beneath the
base.
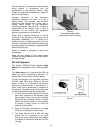
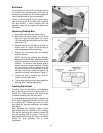
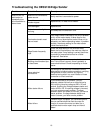
Control Switch Bracket
Mount the control switch bracket (A, Figure 5) to
the top of the sander cabinet with a 4mm hex
wrench, using the four socket head button
screws, lock washers and flat washers (B,
Figure 5) that came installed in the threaded
holes.
Dust Collection
The use of a dust collection system is strongly
recommended for this machine. It will help keep
your shop clean as well as minimize any health
risks caused by wood dust. Make sure your dust
collector has a capacity of at least 1100 cubic
feet per minute (CFM).
Connect the intake hoses of your dust collector
to the 4” diameter dust chutes on the Edge
Sander; there is one on each end of the
machine.
Grounding Instructions
Electrical connections must
be made by a qualified electrician in
compliance with all relevant codes. This
machine must be properly grounded to help
prevent electrical shock and possible fatal
injury.
This machine must be grounded. In the event of
a malfunction or breakdown, grounding provides
a path of least resistance for electric current to
reduce the risk of electric shock.
Figure 4
Figure 5