


13
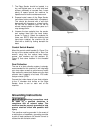
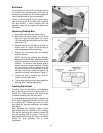
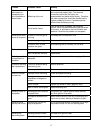
End Guard
The end guard (A, Figure 15) on the right side of
the machine can be swung out of the way for
sanding long workpieces. (The miter gauge will
need to be removed for such a procedure.)
Loosen the hand knob (B, Figure 15) and swing
open the end guard all the way until it catches
the latch behind it. When finished with the
operation, close the end guard and tighten the
hand knob.
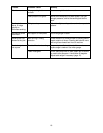
Replacing Sanding Belt
1. Disconnect machine from power source.
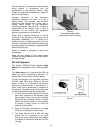
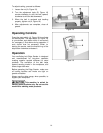
2. Swing the end guard (Figure 15) out of the
way, then open the belt guard (C, Figure
16). Also swing the dust hood out of the way
(see Figure 13).
3. Release tension on the belt by pulling the
tension lever (D, Figure 16) all the way up
until it stops against the screw head.
4. Remove the old sanding belt and replace
with the new one.
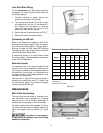
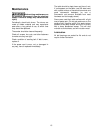
NOTE: Identify the sanding belt direction
before you install the belt, because the belt's
rotational direction must be the same as the
machine. An arrow on the reverse side of
the belt shows the proper direction. The belt
will move left to right as viewed from the
front of the machine. If the belt has no arrow
indicator, find the joint of the belt (where it is
layered) and install it according to Figure 17.
5. Tension the belt by pushing the lever (A,
Figure 16) all the way down.
6. The sanding belt should now be checked for
tracking. See “Tracking Adjustment.”
Tracking Adjustment
“Tracking” refers to the position of the sanding
belt on the drums while the sanding belt is in
motion. For proper operation, the sanding belt
should be centered upon the drive drum.
If a new sanding belt has just been installed, the
initial tracking adjustment should be done with
the machine OFF. Rotate the drums by hand
and adjust the tracking mechanism as needed
(see below).
After operating the machine, further minute
adjustments may be needed to the tracking.
This can be done with the machine turned ON
and the sanding belt in motion. Turning the
tracking adjustment knob (B, Figure 18) should
always be done gradually and in small
increments.
Figure 15
Figure 16
Figure 17