


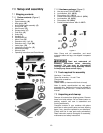


14
6. Riving knife must be parallel to saw blade. See
section 9.6 for inspection and adjustments.
NOTE: A low-profile riving knife is also provided,
for making non-through cuts on the table saw.
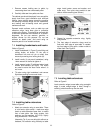
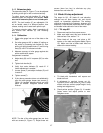
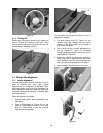
7.14 Anti-kickback pawls
Refer to Figure 12.
1. Install insert plate into table.
2. Position anti-kickback pawl assembly (H) as
shown in Figure 12; the angled side of pawl
block faces toward front of saw.
3. Lower pawl assembly onto center notch of
riving knife, with pawls straddling knife. Push
and hold button on pawl block (on opposite
side of that shown in Figure 12), and push
pawl block down until it securely engages in
notch.
4. Allow pawls to drop freely to the table.
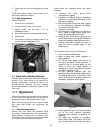
7.15 Blade guard
Refer to Figure 12.
1. Push and hold button (J
1
) at back end of
guard.
2. Push guard (J) down at an angle, as shown,
until pin engages rear slot in riving knife, then
push down front of guard until it seats properly,
and is parallel to table top.
3. Release button (J
1
). The transparent guard
leaves (K) should drop freely to the table.
4. Lift up on guard assembly to verify proper
seating.
NOTE: The transparent leaves can be kept in
raised position by lifting them up and forward.
Guard and pawl assemblies
must be securely installed, and leaves must be
in contact with table, before beginning any
through-cutting operation.
The bracket and clamp plate (E/F, Figure 12) are
adjusted at the factory and no further adjustment of
the blade guard and riving knife assembly should
be necessary. However, proper alignment is very
important. Before operating table saw, read
section 9.6 ,Riving knife alignment, to verify and
follow adjustment procedure if necessary.
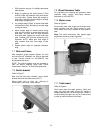
7.16 Dust chute
Use of a dust collection system (not provided) is
strongly recommended during table saw operation.
It will help keep the shop clean, as well as prevent
potential health issues due to dust inhalation.
Attach dust collection hose to the 4-inch dust port
at base of saw, and secure with a wire hose clamp
(not provided).
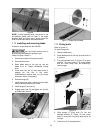
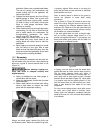
8.0 Electrical connections
The PM1000 table saw is rated at 115/230V power,
and is pre-wired for 115 volt. The table saw comes
with a plug designed for use on a circuit with a
grounded outlet that looks like the one pictured in
A, Figure 13.
Before connecting to power source, be sure switch
is in off position.
It is recommended that the table saw be connected
to a dedicated 20 amp circuit with breaker or time-
delay fuse marked “D”. Local codes take
precedence over recommendations.
8.1 Grounding instructions
1. All Grounded, Cord-connected Tools:
In the event of a malfunction or breakdown,
grounding provides a path of least resistance for
electric current to reduce the risk of electric shock.
This tool is equipped with an electric cord having
an equipment-grounding conductor and a
grounding plug. The plug must be plugged into a
matching outlet that is properly installed and
grounded in accordance with all local codes and
ordinances.
Do not modify the plug provided - if it will not fit the
outlet, have the proper outlet installed by a
qualified electrician.
Improper connection of the equipment-grounding
conductor can result in a risk of electric shock. The
conductor with insulation having an outer surface
that is green with or without yellow stripes is the
equipment-grounding conductor. If repair or
replacement of the electric cord or plug is
necessary, do not connect the equipment-
grounding conductor to a live terminal.
Check with a qualified
electrician or service personnel if the
grounding instructions are not completely
understood, or if in doubt as to whether the
tool is properly grounded. Failure to comply
may cause serious or fatal injury.
Use only 3-wire extension cords that have 3-prong
grounding plugs and 3-pole receptacles that accept
the tool's plug.
Repair or replace damaged or worn cord
immediately.