


13
may result in incorrect tracking. If this occurs,
the oscillation timing can be set to compensate.
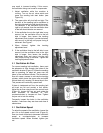
1. Adjust oscillation while the machine is
running. Turn on the air valve switch and
press the sanding belt start button (see
Figure 19).
2. The upper roller will pivot left and right. The
duration of the sanding belt’s oscillation to
the right side and to the left should be equal.
For example, if the oscillation time to the
right is one second, then the oscillation time
to the left should also be one second.
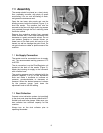
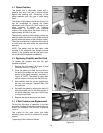
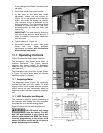
3. If the oscillation time to the right side is one
second, but the oscillation time to the left
side is longer, then loosen the tracking
adjustment lever (rotate it counterclockwise)
and move it to the left until proper timing is
achieved. See Figure 7.
4. When finished, tighten the tracking
adjustment lever.
5. If the oscillation time to the left side is one
second, but the oscillation time to the right
side is longer, then loosen the tracking
adjustment lever and move it to the right
until proper timing is achieved. Tighten the
tracking adjustment lever.
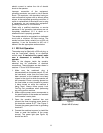
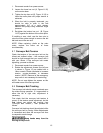
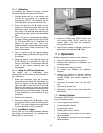
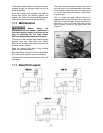
9.2 Oscillation Air Flow
For correct sanding belt oscillation, there must
be adequate air flow through the holes of the
oscillation bracket (Figure 8). When the sanding
belt is operating, its edge will pass over the
holes in the oscillation bracket. The blocked air
flow will cause a sensor to activate the tracking
cylinder, which pivots the upper roller and shifts
the belt back out, causing it to leave the air flow.
This process will continually repeat itself.
If there is inadequate air flow, the sanding belt
will track too far and contact a limit switch.
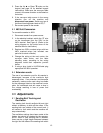
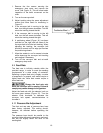
Adjust the air flow using the air flow control knob
(Figure 9). Loosen the jam nut and rotate the
knob clockwise to decrease air flow,
counterclockwise to increase air flow. Tighten
the jam nut to lock the setting.
Frequently inspect the holes in the oscillation
bracket – make sure they are clean and clear of
obstructions.
9.3 Oscillation Speed
To adjust the speed of the oscillation, loosen the
jam nut on the speed control knob (Figure 9),
then turn knob clockwise to decrease oscillation
speed or counterclockwise to increase
oscillation speed. When finished, tighten jam
nut.
Figure 7
Figure 8
Figure 9