


19
10.2.1 Calibration
To establish the distance between conveyor
table and sanding belt, proceed as follows:
1. Connect power and air to the sander, and
turn the air valve switch on to tighten the
sanding belt. NOTE: The controller will not
move the table if the air valve switch is off.
2. Press and hold the UP S button on the
keypad to raise the conveyor table until the
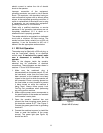
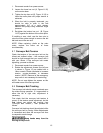
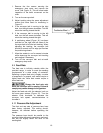
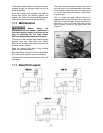
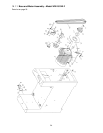
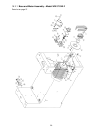
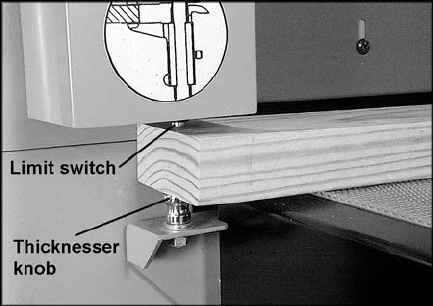
thicknesser knob (Figure 21) contacts the
limit switch. The table will automatically stop
while making slight contact with the sanding
belt.
3. Press “0” (zero) on the keypad (the display
will begin flashing and the input light will be
lit). Then press SET for 2 to 3 seconds. The
display will now read zero. This is the
distance between sanding belt and conveyor
table, upon which further movement of the
table can be based.
4. Input a number using the keypad (display
will begin flashing and the input light will be
illuminated).
5. While the display is still flashing, press the
START button on the keypad (run light will
now be illuminated). The conveyor table will
move to the desired distance from the
sanding belt.
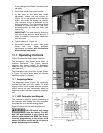
10.2.2 Using the LED for Operations
The sander has a thicknesser which
automatically sets the table at the thickness of
your workpiece:
1. Place your workpiece upon the conveyor
table and move it below the thicknesser, as
shown in Figure 21. Keep the workpiece flat
upon the table. Press and hold the UP S
button on the keypad to raise the conveyor
table. When the workpiece contacts the limit
switch the conveyor table will stop. The table
is now positioned at the thickness of your
workpiece.
2. Remove the workpiece.
3. Press and release the UP S button, which
will raise the table for the first sanding pass.
NOTE: The arrow buttons are programmed
to move the table in .005” increments.
10.2.3 Inch/Metric Toggle
At any time you may switch between standard
and metric measurements by pressing and
holding SET for ten seconds.
Figure 21
4. Press the sanding belt START button and
the conveyor table START button on the
control panel, and feed the workpiece
through the machine.
5. Make further passes as needed, raising the
table each time using the UPS button.
11.0 Operation
Before operating the sander, make sure that:
1. The dust collection system is turned on.
2. Sanding belt tracking and oscillation are
working properly.
3. Conveyor belt tracking is correct.
4. All screws and handles are tightened
securely.
5. Working air pressure is correct. (Normal
working pressure is 75 to 80 PSI.) Do not
operate sander until normal pressure is
reached.
6. Thickness is correctly input into the LED
unit.
7. Feed rate is correctly set.
8. Workpiece is free of nails, knots and other
obstructions.
11.1 Braking System
The sander will not start or will halt operations if
any of the following occur:
• No air supply to the machine.
• No sanding belt installed.
• Improper belt tension.
• Sanding belt runs out of track.
• The emergency stop button on the control
panel is pressed.
• The emergency stop plate on the conveyor
table is pushed.