


RESET
OFF
O
P
U
L
L
ON
I
P
U
S
H
RESET
OFF
O
P
U
L
L
ON
I
P
U
S
H
PULL OUT TO LOCK
RESET
OFF
O
P
U
L
L
ON
I
P
U
S
H
PULL OUT TO LOCK
PULL OUT TO LOCK
OPERATION
ON
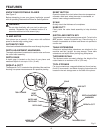
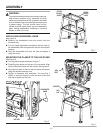
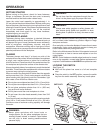
GETTING STARTED
Before turning on the planer, check for loose fasteners,
fittings, or hardware. Be sure the dust cover is securely
mounted and that the blade cutter rotates freely.
Lower the cutter head assembly to approximately 1 in.
(25 mm) above the planer table surface. Without putting any
load on the planer, test the motor by turning the planer on and
allowing it to reach full speed. If the planer sounds excessively
loud or has excessive vibration, turn off the machine
immediately and check again for any loose hardware,
retightening any you may find.
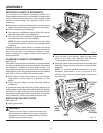
THICKNESS PLANING
Thickness planing sizes workpiece to desired thickness
while creating a smooth, level surface. Thickness of each cut
will depend on type of wood (hardwood versus softwood),
width of workpiece, straightness, dryness, and grain
composition. Whenever working with a new type of wood,
make thin test cuts on a scrap piece of wood first to determine
potential problems with the workpiece.
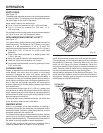
PLANING
Thickness planers work best if at least one side of the
workpiece has a flat surface. When both sides of a workpiece
is rough, use a surface planer or jointer first to define the
initial flat surface. Plane one side of the workpiece then flip
the workpiece and plane the surface of the reverse side.
Always plane both sides of a workpiece to reach the desired
thickness. This will leave the workpiece with uniform moisture
to prevent warp during the drying process.
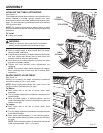
When one end of the workpiece is thicker than the opposite
end by more than 1/8 in. (3 mm), make several cuts with the
planer starting with light planing cuts first. Remember, light
cuts create a finer finish than heavier cuts.
Do not plane a workpiece less than 3/16 in. (5 mm) thick.
Do not plane a workpiece less than 3/4 in. (19 mm) wide.
Do not plane workpiece shorter than 14 in. (356 mm)
long as this will cause kickback.
Do not plane more than one workpiece at a time.
Do not lower the cutter head assembly lower than 3/16
in. (5 mm)
Do not continuously use the planer set at the maximum depth
of cut (1/8 in., 3 mm) and at full width of cut (13 in., 330 mm).
Continuous use at maximum cutting capacity will damage
the motor.
WARNING:
Never plane workpiece with loose knots or
foreign objects. Do not plane workpieces that are
severely bowed, twisted, or knotted. Cutter blades
can dull, chip, or break causing possible serious
personal injury.
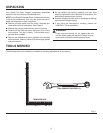
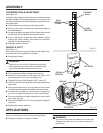
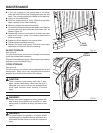
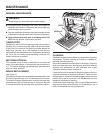
Fig. 15
SWITCH KEY
OFF
WARNING:
Do not force feed the workpiece through the ma-
chine. Let the planer apply the proper feed rate.
WARNING:
Always wear safety goggles or safety glasses with
side shields during power tool operation or when
blowing dust. If operation is dusty, also wear a dust
mask.
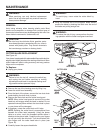
Worn cutter blades will affect cutting accuracy. Planing with
dull or nicked cutter blades may produce ridges or rough
workpiece surfaces.
Gum and pitch on the cutter blades will cause them to wear
prematurely. Using a gum and pitch remover to keep your
cutter blades clean will prolong their wear.
Refer to the
Maintenance Section
of this operator's manual
for instructions on how to remove and replace or turn the
cutter blades.
NOTE: Cutter blades are double-edged and can be turned
once to the opposite, unused edge before replacement is
required. Cutter blades must ALWAYS be replaced as a set.
LOCKING THE SWITCH
See Figure 15.
Wait until the planer has come to a full and complete
stop.
Place the switch in the OFF position, remove the switch
key from the switch assembly. Store key in safe place.
16